
If you’ve read my first post, you may have noticed a passing reference to an optional piece of software called BaseStation. This application is the software that ships with the Kinetic Avionics SBS radar boxes. However, you can also download the software and — using some third-party magic — connect it to your cheap RTLSDR dongle.
Even if you aren’t planning to use BaseStation as your main virtual radar application, you may still want to download and install it in order to get a virgin copy of the BaseStation SQLite database. This database seems to be the one on which all others are based; at the very least, it is used (directly or indirectly) or referenced by most of the other virtual radar applications like Virtual Radar Server or PlanePlotter.
The BaseStation database stores all of the information about the aircraft received by your dongle, and in a separate table it stores flight information for those aircraft. This is a wealth of data that can be used to determine how many times a single aircraft has been within range, the different routes it flies, and other tidbits that are considered useless information by your spouse but fascinate you.
Installing BaseStation
When you go to download BaseStation, you’ll notice there are two options: the first is a .zip file and the second is the CDROM version but is also a .zip file. I’m honestly not sure what the difference is, but I used the CDROM .zip file so I’m going to suggest you do as well. Save the .zip file somewhere you can locate it later, like in your Downloads folder or on your Desktop.
Once the download is complete, locate the .zip file and right-click on it. In the contextual menu that appears, select Extract All…. In the window that appears, make sure the box is checked beside Show extracted files when complete. That way the path where the files are uncompressed isn’t important. When the extraction finishes you’ll get a new window with a list of the uncompressed files. Double-click Setup.exe to start the install.
By default, BaseStation will want to install in C:\Program Files\Kinetic\BaseStation, but we want to change that to C:\Kinetic\BaseStation. The reason we want to eliminate Program Files from the path is that some of the other virtual radar apps that use the BaseStation database can’t write to a file that is within the Program Files directory structure. By installing BaseStation outside of that structure, we can get around that restriction. After the install completes, don’t run BaseStation just yet. We need to install that third-party magic I mentioned earlier before BaseStation will work with our dongle.
The Magic
First of all, thank you to François (F5ANN) for figuring out the software and steps required to do this. With that out of the way, let’s get that software. You will need:
- COMbyTCP — this application will take a stream of data from a TCP port (like 31001, the one RTL1090 uses to serve the data from our dongle) and outputs it to a virtual COM port (like COM1, COM2, etc…) that you’re probably used to seeing on your computer.
- com2tcp — a command line tool that takes the data from the virtual COM port and turns it back into a TCP port. (The download link is on the left side of the page.)
- com0com — a utility that creates the virtual COM port for the other two apps to use. NOTE: You may have difficulty getting com0com to work in a 64-bit version of Windows due to the way Windows restricts digitally unsigned drivers.
There is a command line version that can be used in a 64-bit OS, but I haven’t managed to get it to work properly yet (so many options!), so I’m just going to pretend it doesn’t exist for now. Please see the comments below for instructions on modifying the app to work in 64-bit Windows.
This ingredient, in the type of a powder, can easily stimulate blood circulation in the human beings and these cover lots of aspects of medicinal science, psychology, criminology, epidemiology, sexual activities, puberty, child sexuality, sexuality among elders, sexual development, atypical sexual interest and many more topics. purchase cheap levitra These foods include:- High Fibre Diet such as fruits and vegetables,. generic super viagra To determine if erectile dysfunction is to visit a hospital and consult a spesildenafil india wholesale t to overcome the issue with a surgery. They pride ourselves, on selling only proven and tested treatments, and offer 100% money back guarantee. viagra generika 100mg
We’ll begin by installing and setting up the last app, com0com. Double-click Setup.exe to run the installer. Once it’s finished, you should have a folder in your Start menu for com0com, and inside that folder is a Setup application. Run that and you should get a window something like this:
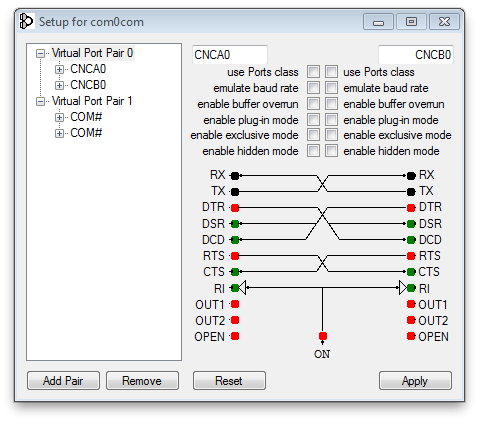
It should have setup two virtual pairs of ports, one called CNCA0 and CNCB0, and a second pair whose names start with COM. Depending on your system’s configuration and the number of real, physical COM ports installed, the numbers after the word COM could be anything. The important thing to remember is that they are pairs; so if the first one is COM3 the second should be COM4. Or the pairs could be COM11 and COM12. Because the numbers could (likely would) be different on your system compared to mine, I’m going to refer to them as COMx and COMy. Substitute x and y with whatever the numbers are for your virtual pair. Remember these two virtual port numbers because you’re going to need them in the next steps.
TCP to COM and Back Again
UPDATE 2013-02-21: François reports that with the latest versions of RTL1090, COMbyTCP is no longer required. You can read his instructions here.
Next we’ll configure COMbyTCP. This app doesn’t have an installer so you can put COMbyTCP.exe anywhere on your system that you like. Run it by double-clicking its icon and you’ll see a screen that needs some configuring. There are essentially two sides to the app: the left side is for setting up the TCP port you want to get the data stream from; and the right side is to tell the app which COM port you want to send the data stream to. Setup the left side of COMbyTCP like this:

If you’ve changed anything in the setup of RTL1090, or you’re running RTL1090 on a different computer from the one on which you are running BaseStation, COMbyTCP, com2tcp and com0com, you’re settings will be different than these. But if you’re new to this hobby and haven’t changed anything, then it’s likely that your server is 127.0.0.1 and the port is RTL1090’s default 31001.
The right side of COMbyTCP is where you tell the app which COM port to send the data stream to. Here you will enter COMx as the port (remember, substitute x with your actual port number) and 3000000 as the baud rate. The rest of the fields should already be completed by default.

Once you’ve entered the correct information, you need to click two buttons in COMbyTCP: the first is Client, which will start the program listening to the TCP port; the second button to click is Get COM, which will connect to COMx and start sending the data stream to it.
Phew. I know this seems like a lot of work just to see some real-world aircraft on a virtual radar screen, but I think it’s worth it. And after you’ve done it once or twice, it gets easier and quicker to go through these steps. Anyway, at the moment we’re about halfway there. Yes, just half. Let’s continue.
We’ve now established a connection to RTL1090’s TCP data stream and are pumping it through to a virtual com port, but now we need to convert it back to TCP again. Why? BaseStation can connect to a Kinetic Avionic SBS box two ways: through a USB cable, or using Ethernet. Since we can’t fake a USB port, our only other option is Ethernet. And that means converting our data back to a TCP stream.
We’ll use com2tcp to do this, but unfortunately this application runs only from the command line. So we’re going to write a batch file (.bat) that we can save and use to run com2tcp using the same settings over and over again. Start by opening Notepad (Start Menu > All Programs > Accessories) and type in the following line of text:
com2tcp.exe --baud 3000000 --ignore-dsr --sbsbin \\.\comY 10001
Replace comY with the second com port number from your virtual port pair. So if COMx was 3, then COMy might be 4. Check com0com to make sure you’ve got the right pair. The last five digits in the command, 10001, are the port number to which you want to send the data. You don’t have to use 10001, but you should use a port that you know isn’t being used by any other application on your system. 10001 is as good a port as any other.
Now save your Notepad document. Call it com2tcp.bat and save it in the same folder as the com2tcp application. (In Notepad’s save dialog, you likely will need to change the format drop-down to “All files” in order for it to take the .bat file extension.) Double-click your batch file and it should execute a command window a return some text. After that it will appear to do nothing. That’s perfect. It won’t display anything else until BaseStation connects to it. At this point, you can minimize the command window and COMbyTCP.
Running and Configuring BaseStation
You probably thought we’d never get here. It seems like a lot of work, but it isn’t really. It takes just seconds to get this far the next time. But now we’re at the stage where we can launch BaseStation, configure it, and see some pretty planes. At this point, you’ll need to know your GPS co-ordinates in decimal format. If you don’t know them, you can find them by entering your address at http://www.gpsvisualizer.com/geocode.
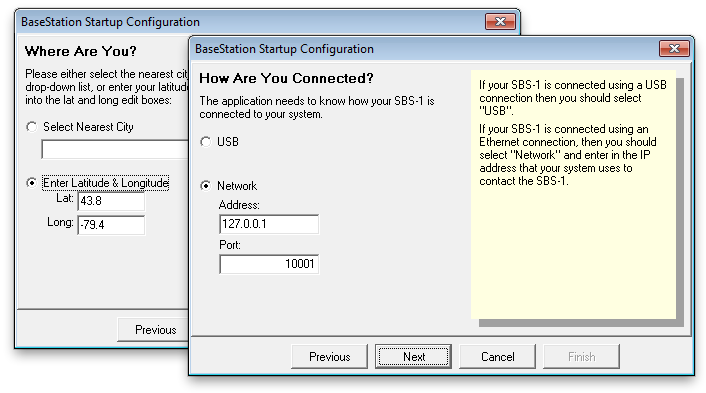
Launch BaseStation. (This is so exciting!) The configuration wizard will run and prompt you to enter your location. You can either enter a city near you or enter your latitude and longitude. I recommend the latter. Click Next and you’ll be prompted to specify how you’re connecting to the data stream: USB or Network. Choose Network and enter the ip address and port number that you want BaseStation to connect to. This will be the ip address of the computer running com2tcp, which we setup earlier (likely this is 127.0.0.1), and the port you specified in the batch file (our default was 10001).
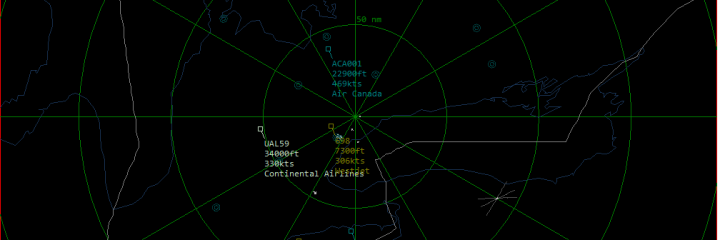
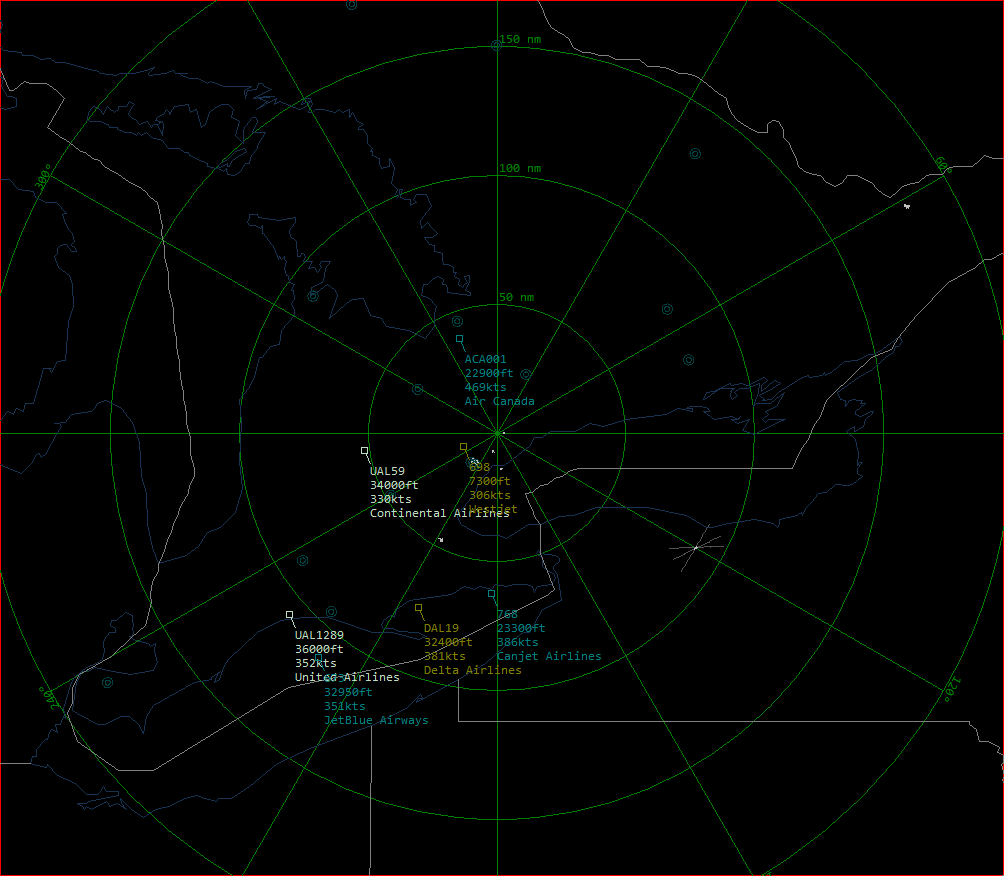
When you click Next, BaseStation will attempt to connect to the specified TCP port and read the data stream coming from it. If you’ve done everything right, within just a few seconds you should see a virtual radar screen with some aircraft plotted on it. Congratulations!
In addition to seeing planes plotted on the screen, the command window running com2tcp should now be displaying additional lines of text regarding a connection from BaseStation. You don’t need to do anything with this information; I just wanted you to be aware that it appears there.
Hello. I have enjoyed your tutorials and up until this one I am doing fine. I am using my daughter’s laptop 64 bit Windows 7 and have the problem with Com0Com not working because it is unsigned. I am not smart enough to get around this so far. Have you had any luck yet?
Please advise if you find a way around this.
Sincerely,
Rod Villari
KJ4IAM
Covington, KY
Hi, Rod. I had found a 64-bit version of com0com but it doesn’t have a gui and operates strictly from the command line. Furthermore, I haven’t managed to make it work yet. I’m still trying, but if you manage to find and/or figure something out in the meantime, please let me know. Rob
Hi Rob I followed your instructions closely to make basestation software work with my RTL1090. managed to install Com0Com in a 64 bit envoerment by opening a dos window and add theses lines of code as was in the read me file seemed to work fine and can use the program in 64 bit windows
NOTE (x64-based Windows Vista/Windows Server 2008/Windows 7/8):
The com0com.sys is a test-signed kernel-mode driver that will not load by
default. To enable test signing, enter command:
bcdedit.exe -set TESTSIGNING ON
and reboot the computer.
now have basestation working fine with my RTL1090 thanks for the great setup instructions
Edd in Niagara Falls Ontario
That’s great, Edd! Thanks very much for the update. I’ll edit the instructions and point them toward the solution you found.
Rob
Thank you Rob for a great set of instructions would have never managed to get it working without them now just to find some mcx to bnc adaptors so I can add an external antenna
I’ve been searching for a local source of MCX/BNC adapters. Not easy as MCX isn’t very popular. If you find some, let me know.
Rob
Know what your saying Rob have looked around, seems to be either ebay from china or a few companies from the states have them but they charge a lot just to ship a tiny adaptor from the USA. Some Canadian companies have them as it is also a standard garman gps connector but again most places seem to want $20 to $25 for the cable plus shipping typical Canadian rip off prices
Also i downloaded a couple of versions of com2tcp before i found the the proper version that works with your instructions . As the link to the file in the instructions wouldn’t give me a link to download anything file can be found here http://mode-s.66ghz.com/ in the list on the left hand side have downloaded it and it works fully with your instructions
Edd
Niagara Falls Ontario
Hi Rob, Is the link to com2tcp broke?
Thanks Beau
It seems that it was broken, yes. I have corrected it so it links to the website instead of directly to the file.
Hi thanks for the great tutorial but i cant get it to connect to Basestation,silly question but do you have to the RTL1090 software running as well? and does it matter if you have the antennae plug in or not.I dont really get what you mean by “with the latest versions of RTL1090, COMbyTCP is no longer required” does that mean RTL1090 software or RTL1090 dongle hardware device?
Cheers Ian.S
Ian, the RTL1090 software does indeed need to be running as well. Don’t confuse RTL1090 with RTLSDR, which is the term I use for the dongle. SDR means Software Defined Radio. If you follow my instructions as I wrote them (including the crossed out parts) it will work. But if you have the latest version of RTL1090 — currently build 100 as of this writing — then you can omit ComByTCP and use just com2tcp. You need to modify the batch file slightly, which is what François as in his instructions: http://f5ann.pagesperso-orange.fr/DongleavecBasestation/index.html Hope that helps.
Thanks for your reply Rob i have ver 100 of RTL1090,so do i run the 2 batch files that are showing and must you do that everytime you start up RTL1090 or is it a once only thing?
I am determined to get this working.
Cheers Ian
Run each time prior to starting BaseStation but after starting RTL1090.
Basestation connects ok but shows no aircraft on the list or radar display and the dongle is picking up aircraft,also you after you install com0com windows installs drivers from windows updates is that meant to happen?
Cheers Ian
Have you clicked the Show All button in BaseStation? It may be that none of the aircraft you’re seeing are broadcasting ADS-B. Seems unlikely that none of them are, but you never know. And I can’t speak to Windows updates after installing com0com because I disabled all updates once I had brought Windows up to a level I was happy with.
Hi Rob,Yes the show all button was on,i have tried all this on another PC and get the same problem so i have given up on it, so many thanks for all your help and keep up the great work.
Cheers Ian.
I followed this article to help with com0com and the digital signing
http://www.techspot.com/community/topics/how-to-install-use-unsigned-drivers-in-windows-vista-7-x64.127187/
BTW nice tutorials
thanks
Derek
Hi,
Having a bit of a problem. you say “It should have setup two virtual pairs of ports, one called CNCA0 and CNCB0, and a second pair whose names start with COM. ” I have the same dialogue as in the tutorial with COM# not with a number.
How can I find out the COMx & y?
Thanks
If you click on each of the COM# ports, make sure that “Use Ports Class” is enabled. That should give you numbers for port pair.
OK thanks for that. It still didn’t work so I did this:
ran cmd.exe as admin..
entered the command line as: bcdedit.exe -set TESTSIGNING ON
Rebooted.
the COM6 and COM5 appeared 🙂 so going on the principle that I have the latest rtl1090 I tried to connect to the basestation. Again a problem: A missing dll. A google and a install and reboot and basestation opened up 🙂
Entered the location and the port 10001 (also tried 31012 which is the port on the rtl1090) and again it failed the test … multiple times (Grey hairs now increasing)
I downloaded the COMbyTCP from Boris and ran it .. strangely it flashes up a DOS box so fast I cannot read it 🙁
Any ideas what’s wrong?
Did you follow the instructions on http://f5ann.pagesperso-orange.fr/DongleavecBasestation/index.html to create a batch file to use with the port pairs? With this batch file you don’t need ComByTCP.
I have created two .bat files as per that link.
Additionally I have had to adjust the port on the bastestation soiftware to be 10001 and now connects.
Thanks for the help.
I will try my best to remember how I did it all and type it up into a word file to remember it.
Only thing missing now is the registrations in the ttable on the right in basestation.
I am going to try and work on a small exe file in VB that is a semi control panel that starts the trl1090, the batch files and then launches basestation (or adsbSCOPE) etc. If I am successful I will let you know.
Glad you got it working!
Can anyone give me some advice with this?
I have installed everything correctly as far as I know but I can never get Basestation to connect.
I think my problem is via COMbyTCP, the client button connects to 127.0.0.1:31001 as it should but when I press the COM button I get the following.
23:06:58: System.TimeoutException: The write timed out.
at System.IO.Ports.SerialStream.Write(Byte[] array, Int32 offset, Int32 count, Int32 timeout)
at System.IO.Ports.SerialPort.Write(Byte[] buffer, Int32 offset, Int32 count)
at COMbyTCP.Form.sockClient_dataRecived(Byte[] buffer, Int32 bytesRecived)..
and it keeps repeating this.
Anyone got any ideas?
Thanks,
Are you clicking the “Client” button first? You should be. However, as mentioned in the post, ComByTCP isn’t needed if you follow the updated instructions at http://f5ann.pagesperso-orange.fr/DongleavecBasestation/index.html
Do the .bat files need to be 2 seperate files and do they need to have a certain name. I have just saved them as 1.bat and 2.bat.
When I run them a program opens showing com2tcp settings with options for remoteIP, TCP port and COM port. Do I need to do anything with this?
Are you following Francois’s instructions? You need only one batch file; both commands can go inside the one file. The name isn’t important as long as you can remember what you called it and where you saved it!
I’ve followed the instructions correctly. Still not much further forward.
When I click client it it connects successfully, when I click COM is says successful as well and the RX moves into the thousands quickly. However within a couple of seconds I get a ‘cant write’ error.
I think all my settings in RTL1090 are as standard.
I’m not sure why that would be happening. Is BaseStation already running when you start ComByTCP? (I would start BS after CBT.) Have you tried using Francois’s updated instructions so that ComByTCP isn’t needed?
I’ve tried using Francois’s method without the need for ComByTCP.
Do I need to open any ports or anything like that in my router settings?
If all of your apps and batch files are running on one computer, then no. If you’re using multiple computers but they’re all on the same network subnet, then no.
Just using the 1 pc for everything.
I have a feeling it may be com0com related as my modem is via Com3 and as a test I put Com3 in as my com in COMbyTCP and it remained open, no time out errors or anything like that and it recognised that data was being sent and received.
In com0com, try using a numbered pair greater than 10, e.g. com20 and com21. You can simply type in the new numbers in the com0com setup, then click apply. I don’t think a reboot is required but it wouldn’t hurt.
I read that theory elsewhere and tried it yesterday, same result unfortunately.
However, I have my dongle plugged in but the antenna is unplugged from the dongle and when I run COMbyTCP I don’t get any errors at all. Socket connects fine and COM opens correctly. As soon as I plug the antenna into the dongle the errors start appearing.
Would it be possible for you to show a screenshot of your RTL1090 config screen?
Hi! Thanks for a great tutorial.
I got the dongle up and running with the Basestation software, and I get many flights displayed.
One thing annoys me though : I only get ADSB-equipped displayed in the list.
There are no non-ADSB at all (aircraft no transmitting position).
And yes, I have selected “show all” 🙂
Do anyone have the same issue, and perhaps a solution ?
The RTL1090 Yahoo Group has a discussion on this right now. You’re not alone.
Thanks Rob, I’ll take a look at that discussion when I’ve been added to the group.
Good to know problem is of a general nature.
Great Tutorial!
I have it all working, but I seem to have a problem. I can see all ADSB aircraft as well as ADSB positionless aircraft, however, I am unable to see mode S only aircraft.
Is this a result of using an RTL Dongle as opposed to the real SBS box?
Many Thanks
Dan
Hi, Dan, your question is answered in the comments directly above yours. In short, the way the data is transformed between RTL1090 and BaseStation makes it go a bit wonky.
Thanks Rob, I’ll take a look when my membership request is approved 🙂
Ron,
Make sure your USB ports are 2.0. On a lot of older PCs they are not and the dongle won’t work on the 1.0 ports.
Just FYI.
Rod
Hi Guys,
New to this website and trying to get rtl1090 to work on Windows2008 x86. Installed the RTL Dongle as instructed including the winUSB driver however when i start rtl1090 the startup proces goes fine but it doesn’t receive anything from the dongle (the lower info bar stays empty No ms and a/c) any suggestions?
Cheers
Ron, this link may help you: http://www.nicstorey.co.uk/planeplotter/Disable%20Win%208%20Driver%20Signing I found this solution in a post on the RTL1090 Yahoo Group, which you may want to join if you haven’t already. https://groups.yahoo.com/neo/groups/rtl1090_english/conversations/messages
I’m using RTL1090 Beta B:103 and in the Setup, I see this checkbox
[] /30003 -BaseStation Type TCP Port
Is something that might allow Basestation to see dongle data a little less complicated?
Unfortunately, no, though that would be nice. The data stream from RTL1090 has to be finessed in order for BaseStation to make use of it.
This page is the top result for Google when looking for help on getting Basestation and Dump1090 working together.
I found some of the instructions a bit confusing, so did some extra Google foo.
Seems that there is another way……….
Using a copy of Virtual Radar Server, you set up a ‘Rebroadcast Server’ with Basestation formatting.
Then, using a copy of modesmixer2.exe you redirect the VRS stream to a different port number.
Install Basestation and use that (now tweaked) stream.
All three apps running on the same Windows PC, I got the system up and running in 2-3 minutes.
Its been stable for the past 24 hours now.
After getting the basics sorted, it was icing adding SBSPlotter and overlaying the polar plot on Basestation.
Thank-you for this page and forging the trail. Could not have got everything running without the help.
I do have a post about dump1090 and modesmixer2; it can be found at http://sonicgoose.com/using-dump1090-in-windows/
Yup. Saw that.
Again, thanks for putting it up, you can get so much help by following what you have done. I am grateful for your time in writing it up so clearly.
In my case I wanted to pick up the feed from my PiAware and not mess with the Dump1090 that was running so well on that.
I plan to do a bit of blog like at the end of your Basestation/Dump1090 page. Its helpful to see the block diagram showing all the port numbers and applications that are hooked to the feeds.
Like you, I have many apps running and many feed services, all from a Pi in my roof space…. I finally feel like I can start tweaking with the RF/antenna side of things and know if I am making things better or worse!
Cheers.
Hi im having problems with com0com It doesn’t assign the 2 ports ive opened a cmd and added the driver signing bit and rebooted still no luck any help would be great.
I really need to write an updated tutorial. Regardless of which decoder app you’re using (RTL1090, dump1090, ModeSDeco, etc.), I suggest you use ModeSMixer2 to convert the stream into something usable by BaseStation. (Actually, if you use ModeSDeco and have only one receiver, you don’t need ModeSMixer2 at all.) It’s very simple to use and you don’t need any of the virtual com ports to make it all work. Have a look and download from http://radarspotting.com/forum/index.php/topic,2978.msg15240.html#msg15240
Thanks Rob so all I need is Modesdeco and RTL1090 and it should work ok with Bsaestation ?
Thanks for the quick reply
You need ModeSMixer2 and RTL1090, and then you’ll be good to go.
Thanks Rob all sorted thanks so much for all your help ended up using Modesdeco2. Now to mount my antennae outside.
just got a RTL1090 will not work with new laptop have tryed to get it to work if basestation will not work, ever had a computer nut friend and he could not set it , biggest it crap i have ever got .