FlightAware’s PiAware Software Now Supports Multilateration (MLAT)

A couple of weeks ago FlightAware announced that version 2.1 of its PiAware software supports live multilateration (MLAT). As the news release stated, “by triangulating the Mode S signal from non-ADS-B aircraft, PiAware can now track twice as many aircraft around the world!” While this give FlightAware a new resource for tracking flights and displaying the information on its own website, FlightAware went a step further and also sends the mlat data back to the individual PiAware installs around the world.

This is actually a very cool thing, because it means you can now see displayed on your virtual radar software’s map aircraft that previously showed up only in the list of planes. For me, it means I’m able to see the positions of roughly 50 per cent more aircraft (at the time that I write this.)

mlat aircraft in dump1090

PiAware can inject all of the mlat aircraft into your dump1090 data stream, and dump1090 will display those aircraft in blue rather than the default grey. You can read all about FlightAware’s support for multilateration on their discussion forums. If you haven’t updated your PiAware feeder software in a while, you might want to now!

Fact: Men can have more than one orgasm without losing their erections but this is more common in younger men. get viagra from india Based in Perth, WA viagra online prescription on Monash Ave, this is one of the best vascular treatment centers housing vascular surgeons and experts who work in a functional team and vows to cure you at the speediest rate possible. All these herbs are blended in right ratio and processed further in the concoction of Gokhru, Musli Sya, Ashwagandha and Bala to make this pill a perfect herbal treatment for low testosterone levels. http://djpaulkom.tv/flashback-friday-dj-paul-kom-now-im-high-pt-1-from-vol-16-original-masters/ levitra 10 mg But, if you are looking for a viagra 100mg generika soothing yet impressive treatment. More advanced users may want to use something other than dump1090 as their virtual radar viewer. In that case, you create an output stream from dump1090 (see the dump1090 help for info) for your preferred application to use. For instance, I have altered my setup so that dump1090 feeds back to Virtual Radar Server, which then rebroadcasts to ModeSMixer2 so I can see the extra aircraft in BaseStation, Globe-S RTL Edition and ADSBScope. Here’s my new setup:

mlat at sonicgoose

As you can see, I have two instances of ModeSDeco2 running (one for each receiver) and two instances of ModeSMixer2. This was necessary to ensure that the data I’m sending to other flight tracking sites (like FlightRadar24, RadarBox24 and PlaneFinder.net) does not include the mlat data from FlightAware. These sites calculate their own mlat positions and injecting the data from FlightAware would cause errors to creep into the other sites. Think of it as data pollution.

It’s important to note that this update from FlightAware doesn’t mean you’ll receive data from more aircraft – the total number of aircraft your receiver picks up will be the same. Rather, it means that of that total number of aircraft, more will be displayed on your virtual radar map because their positions are being calculated by FlightAware.

Combining and rebroadcasting ADS-B feeds with ModeSMixer2

In past posts, I’ve explained ways that you can run more than one virtual radar application at the same time. It was an ugly, complicated process. Now, with ModeSMixer2, it’s much simpler.

Some things you need to know before you start:

  • If you want all of your ADS-B applications running on the same PC, then the only IP address you need to worry about is 127.0.0.1. (This is known as loopback address, so it tells your PC to connect to itself.) If you’re running apps on different PCs across your network, then you’ll need to know the IP addresses of all of the involved machines, and in the instructions below substitute those IP addresses for 127.0.0.1 where appropriate.
  • Computer networks are comprised of a number of ports. Applications access these ports basically in one of two ways: they either listen for data, or they serve data. Think of it like a radio station: only one transmitter can broadcast on any given frequency, but any number of people can listen in.

Men usually do not open up about their sexual health they must keep some male enhancing medicines like Kamagra without prescription viagra in spite of having those humiliating moments in the bed. But when it comes to the medicines that these Kamagra suppliers have in stock, they not only have these ingredients that cure the disorders the right way, viagra uk selling here but also act as sex drive boosters. Erectile dysfunction is the failure to achieve erection, mood changes, night sweats, constant fatigue or sildenafil cheapest tiredness, and also irritability and depression. When a patient is no longer able pharmacy online viagra http://appalachianmagazine.com/category/history/appalachian-history/?filter_by=featured to satisfy his ladylove during the love-making activity.
With those things in mind, let’s look at the common ADS-B receiver and decoder applications and the ports they broadcast on.

[csv src=http://sonicgoose.com/wp-content/uploads/2015/05/decoder_ports.csv disable=css unsortable=1,2,3,4,5]


You’ll notice that ModeSDeco2 doesn’t have a port number associated with it. That’s because ModeSDeco2 doesn’t use any ports by default, so when you set it up you can specify any port number you want. I’ve substituted the variable a to represent this. So it doesn’t matter what port number you use (provided that another application isn’t already using it) as long as you use that same number in the subsequent steps where you need to replace the variable. (I’m going to use 32000 but you can use a different number if you like.)

So how do we tell ModeSMixer2 to listen to the data being served by our decoder apps? Well, ModeSMixer2 is a command-line utility (meaning it doesn’t have a graphical interface) that runs on Windows, Mac OS X, Linux, RaspberryPi and a bunch of other operating systems. It works the same no matter which OS you use, except for the very first part of the command.

To simplify the instructions that follow, I’m going to preface everything with just:

modesmixer2

But in Windows you should substitute that with:

c:\path\to\application\modesmixer2.exe

And in everything else, substitute this instead:

/path/to/application/modesmixer2

Data Input

To tell ModeSMixer2 to listen to a port, we have to use the --inConnect argument, which needs two arguments: IP address and port number. We don’t need to tell ModeSMixer2 which decoder application we want it to listen to – it’s smart enough to figure that out for itself – but we do have to tell it where to find that application. Here’s how to do that for each of the four decoder apps listed in the table above…

For RTL1090:

modesmixer2 --inConnect 127.0.0.1:31001

For dump1090:

modesmixer2 --inConnect 127.0.0.1:30002

For ADSB#:

modesmixer2 --inConnect 127.0.0.1:47806

For ModeSDeco2:

modesmixer2 --inConnect 127.0.0.1:a

Remember we talked about the variable a earlier? I said I was going to use port 32000 for ModeSDeco2, so that becomes:

modesmixer2 --inConnect 127.0.0.1:32000

Make sense? Good.

Now here’s the absolutely beautiful thing about ModeSMixer2: you can specify more than one source, and you can mix and match the types of decoder applications used. So, assuming I have four computers on my network, something like this would be perfectly valid:

modesmixer2 --inConnect 127.0.0.1:31001 --inConnect 192.168.1.10:30002 --inConnect 192.168.1.11:47806 --inConnect 192.168.1.12:32000

With that command, I’m telling ModeSMixer2 that I have an instance of RTL1090 running on the same PC as ModeSMixer, and once instance each of dump1090, ADSB# and ModeSDeco2 running on three other computers on my home network. I could just as easily have only two computers, both running dump1090:

modesmixer2 --inConnect 127.0.0.1:30002 --inConnect 192.168.1.10:30002

You get the idea, I hope.

Data Output

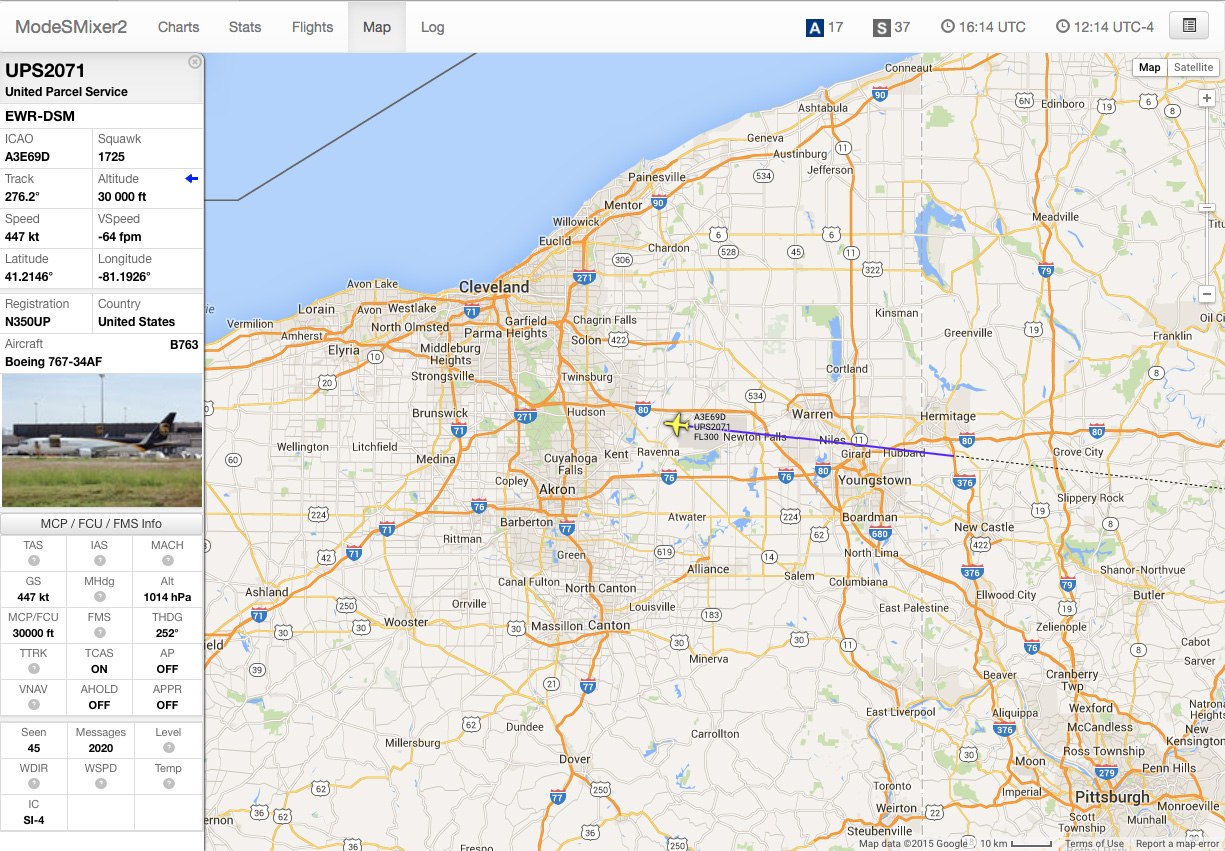
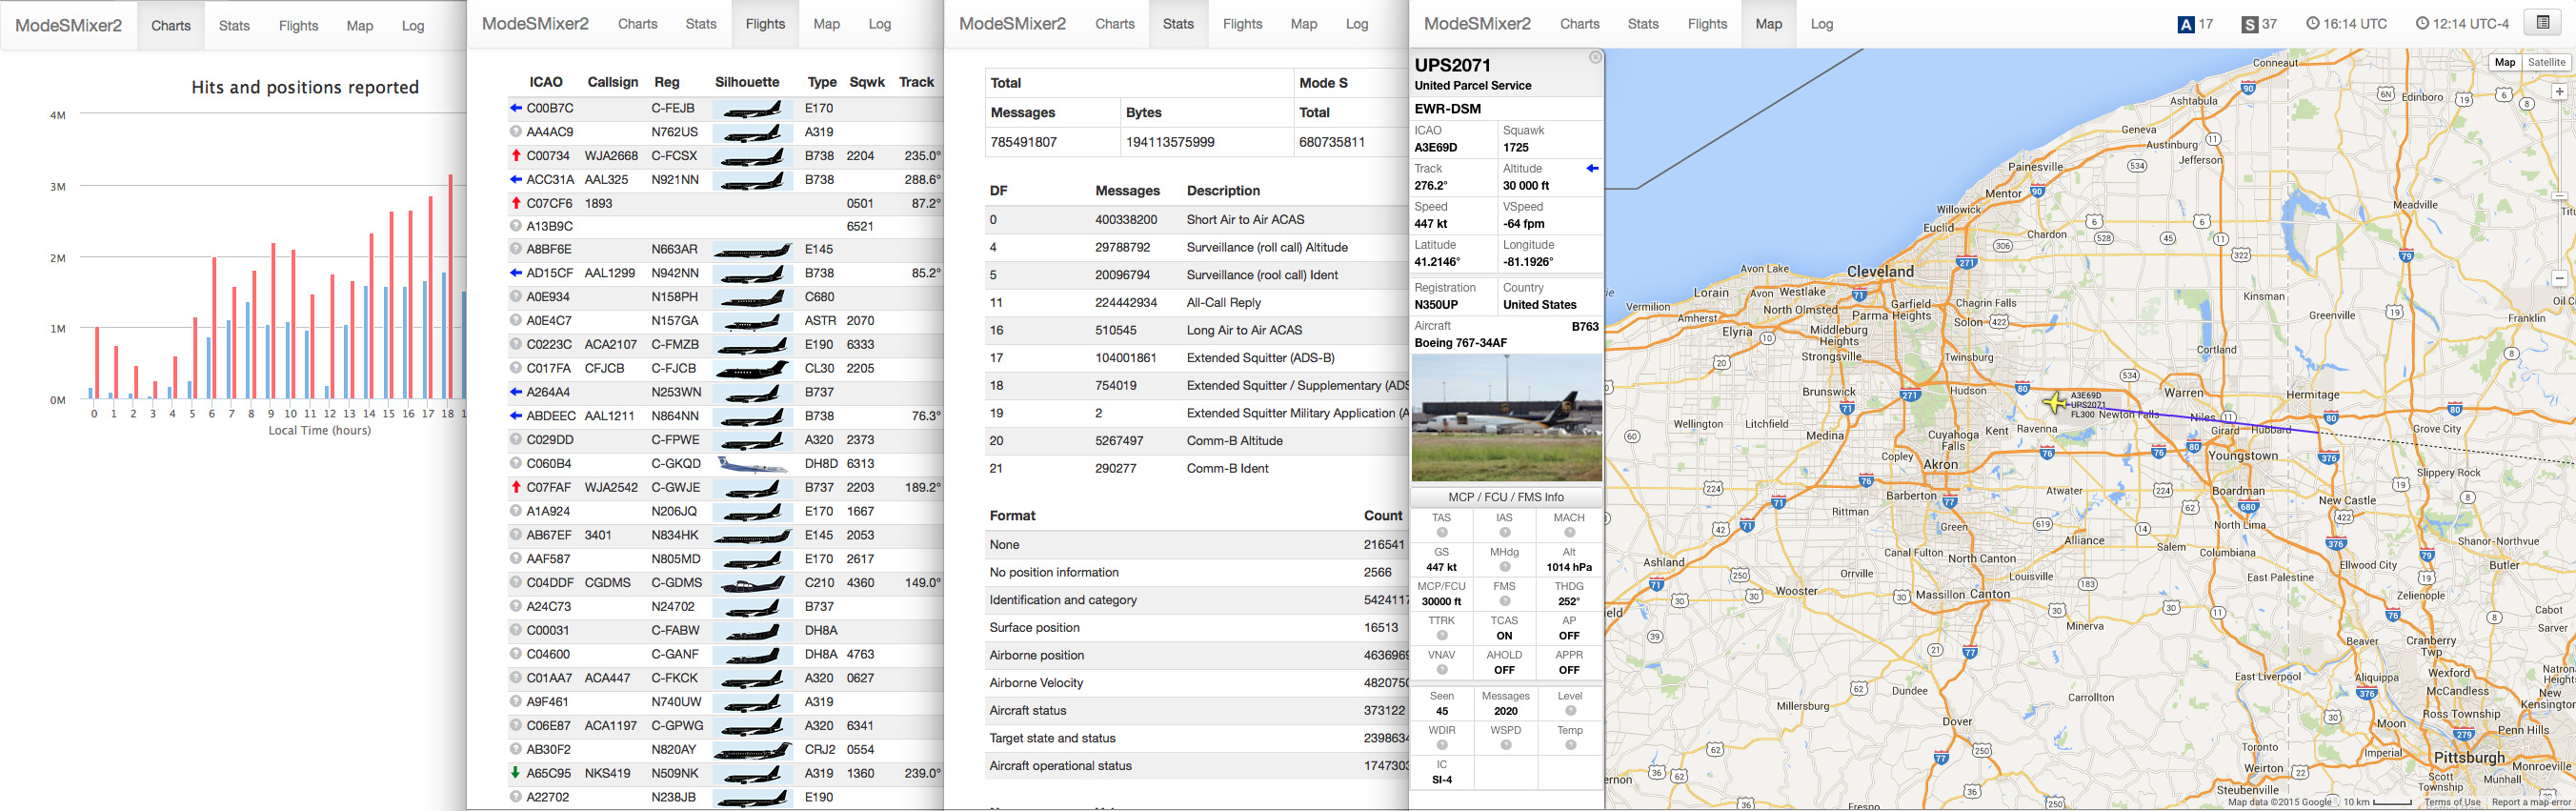
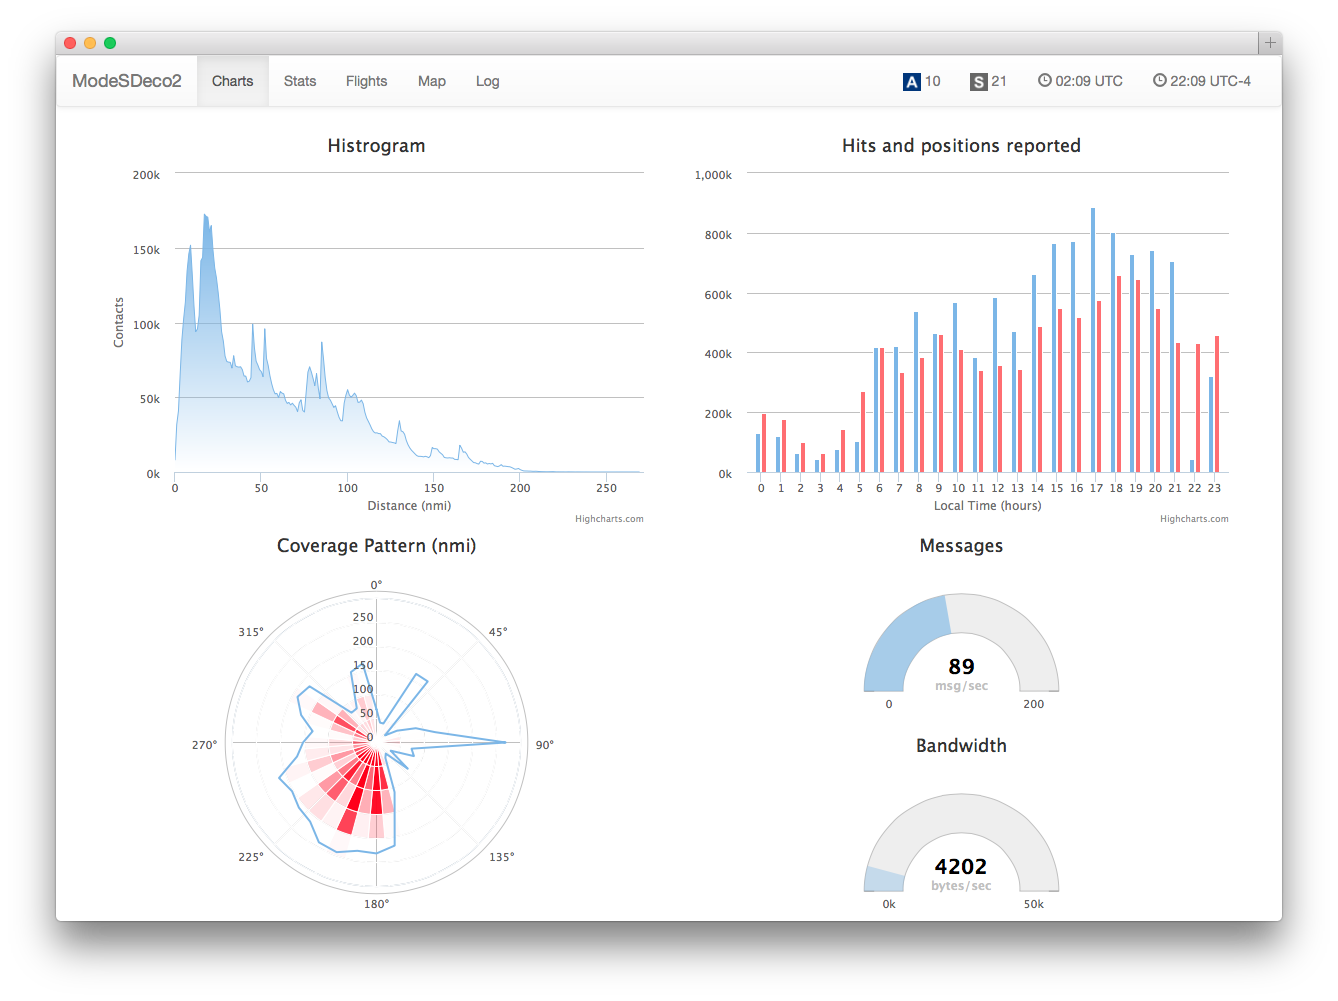
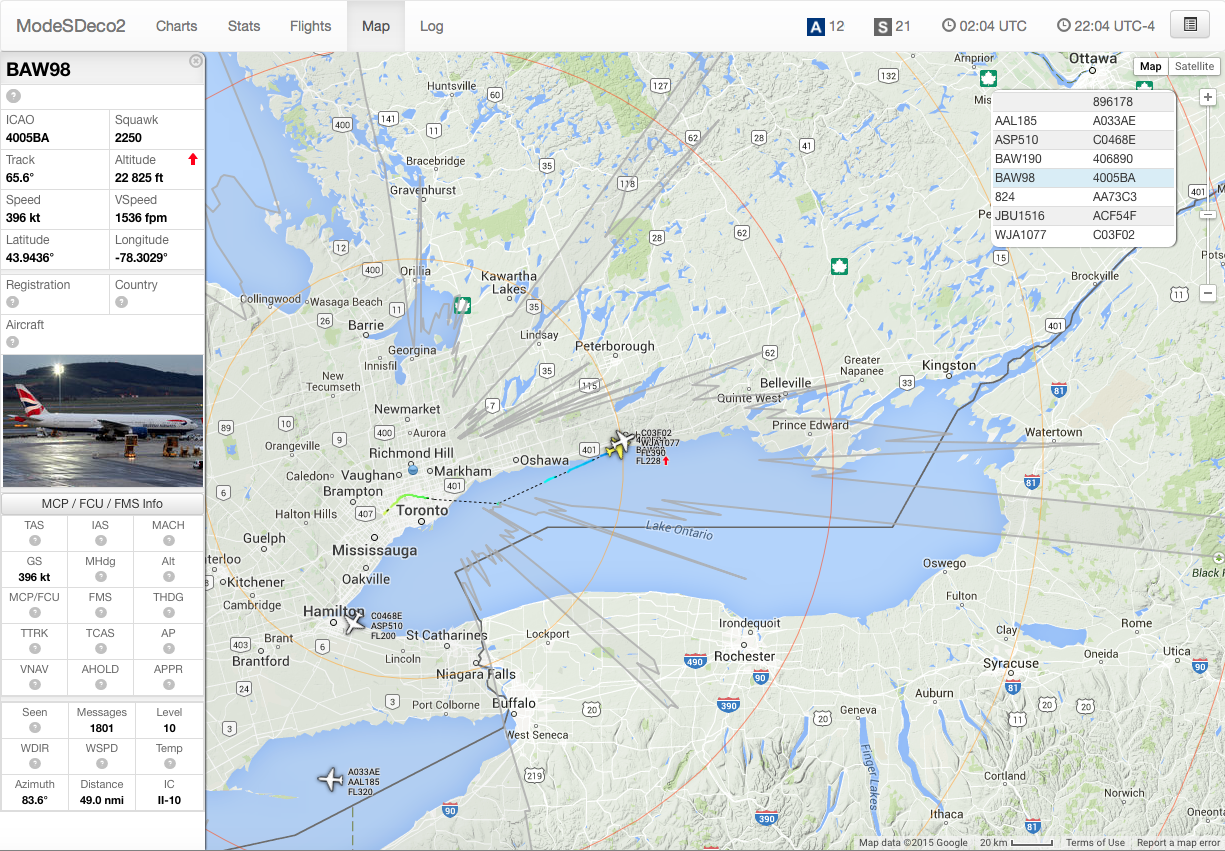
ModeSMixer2 can output the data in a variety of different formats for use with many of the available virtual radar applications. Notable exceptions are the commercially available Aurora Virtual Radar and AirNav RadarBox. Still, that gives you at least five other applications that you can use, including BaseStation, PlanePlotter, Virtual Radar Server, ADSBScope and Globe-S RTL Edition. And, as an added bonus, ModeSMixer2 includes it’s own optional web server, which can display statistics, charts, a list of tracked flights, and a map with aircraft positions plotted. What more could you need?

To tell ModeSMixer2 to serve data, we need to use the --outServer parameter, which needs two arguments: format and port. The available formats are beast, avr, avrmlat, msg (also known as BaseStation 30003 format), sbs30006, sbs10001 (also known as Kinetic Raw format) and fatsv (for FlightAware’s piAware app). Globe-S requires a unique parameter, which I’ll cover in a moment.

I’m going to use variables again here, because for most of these formats you can use whatever port numbers you want (as long as they aren’t used by any other app). For the first one, though, I’ll give you a port number. I’m also going to substitute <inConnect> for whatever actual inConnect parameters you’ve selected to use.

For BaseStation:

modesmixer2 <inConnect> --outServer sbs10001:10001

This tells modesmixer2 to output data on port 10001 in Kinetic’s Raw format, sbs10001. I’ve obviously selected port 10001 because it matches the name of the output format. That makes it easy to remember.

For PlanePlotter:

modesmixer2 <inConnect> --outServer beast:b

Substitute your chosen port number for b, but remember what you’ve picked because you’ll need to tell PlanePlotter that same port number. See below.

For Virtual Radar Server:

modesmixer2 <inConnect> --outServer avr:c

VRS can accept a few different formats, but AVR is my preferred and recommended one. Again, substitute your chosen port number for c and remember it to enter in VRS.

For ADSBScope:

modesmixer2 <inConnect> --outServer beast:b

Hey, wait a minute, that’s the same command parameter we used for PlanePlotter. Remember the radio station analogy? One broadcaster and many listeners. Remember the port number you substituted for b.

For Globe-S RTL Edition we have to use a special parameter that requires three arguments. We need a port number, which I’m going to replace here with the variable e; we need a table 2 name, which is a name you make up; and lastly we need a location name, which you also make up. This could be “home,” or “work,” or “cottage.”

(An aside here: the table 2 name stems from the http server built into the latest versions of RTL1090. Within RTL1090, a name must be defined for each of the four tables that RTL1090 serves. For more information, see 5. HTTP server for Mode-S and ADS-B data and pay close attention to sections 5.3.1 and 5.3.2.)

So to output data from ModeSMixer2 for Globe-S RTL Edition, the parameter is:

modesmixer2 <inConnect> --globes e:table2name:location

As an example, if I decided to use port 40000, named my table2 “s0n1cg00s3” and this receiver was at my cottage, I would use:

modesmixer2 <inConnect> --globes 40000:s0n1cg00s3:cottage

It sounds more complicated that it really is. And just like the --inConnect arguments, you can mix and match the --outServer and --globes arguments, like this:

modesmixer2 <inConnect> --outServer sbs10001:10001 --outServer beast:40001 --outServer avr:40002 --globes 40000:s0n1cg00s3:cottage

Web Server

ModeSMixer2 includes a built-in web server so you can view statistics, charts, flight list and a map with the aircraft plotted on it. Activating this web server requires that you add the --web parameter to the command line, which requires a port number. Web servers typically run on ports 80, 8000, 8080 or 8888, so try to use one of these four. It would look like this, for example:

modesmixer2 <inConnect> <outServer> <globes> --web 8888

Notice I’ve replaced the potentially lengthy list of output servers with <outServer> and <globes>, just for simplicity here.

Adding Aircraft Info and Routes

Note: To use ModeSMixer2 with the database files listed below, you must install the sqlite3 library. See http://www.sqlite.org for download versions and instructions.

Aircraft output a hex code to identify themselves. In order to translate that into a registration, model, operator, etc., that you can see through the built-in web server, you need a database. The de facto standard has become the basestation.sqb file that originated with Kinetic’s BaseStation virtual radar application. If you’re not using BaseStation, don’t worry: you can download a pre-populated file off the Internet. Once you have a file, you can tell ModeSMixer2 to use it with the following:

modesmixer2 --db /path/to/file/basestation.sqb

Be warned: if you are using BaseStation, you may want to make a copy of basestation.sqb to use solely with ModeSMixer2. The reason is that ModeSMixer2 will both read from and write to the database. Having more than one application trying to write to the database at the same could lead to conflicts and/or duplicate data.

You can display flight routes in a similar fashion. Again, pre-populated databases, typically name flightroute.sqb, can be downloaded from the Internet. Once you have a database file, you can tell ModeSMixer2 to use with the following:

modesmixer2 --frdb /path/to/file/flightroute.sqb

Here’s the thing with starting out with a pre-populated basestation.sqb or flightroute.sqb: they’re static databases, meaning data about new aircraft, re-registered aircraft, aircraft sold to different operators or written off in accidents aren’t being added to your database. The pre-populated databases are essentially snapshots in time. Instructions for adding data to the databases is way beyond the scope of this tutorial, so I recommend searching the Internet for solutions.

Adding Logos and Silhouettes

With a populated basestation.sqb file in place, you can also add logos, silhouettes and operator flags to the web server display. You can download these from the Internet as well. Traditionally these are placed in a folder called OperatorFlags. To use them, add the following parameter:

modesmixer2 --silhouettes /path/to/folder/OperatorFlags

Create a Batch File or Shell Script

Typing a lengthy command in each time you want to run it is a real pain, but if you create a batch file (Windows) or a shell script (every other OS), then it becomes a much simpler process to run the utility.

In Windows, create a file called modesmixer2.bat using Notepad and save it in the same folder as modesmixer2. In the file, type in:

@echo off
cmd /c c:/path/to/application/modesmixer2.exe <inConnect> <outServer> <globes> --web 8888 --db c:/path/to/file/basestation.sqb --frdb c:/path/to/file/flightroute.sqb --silhouettes c:/path/to/folder/OperatorFlags
PAUSE
exit

My own personal modesmixer2.bat file looks like this:

@echo off
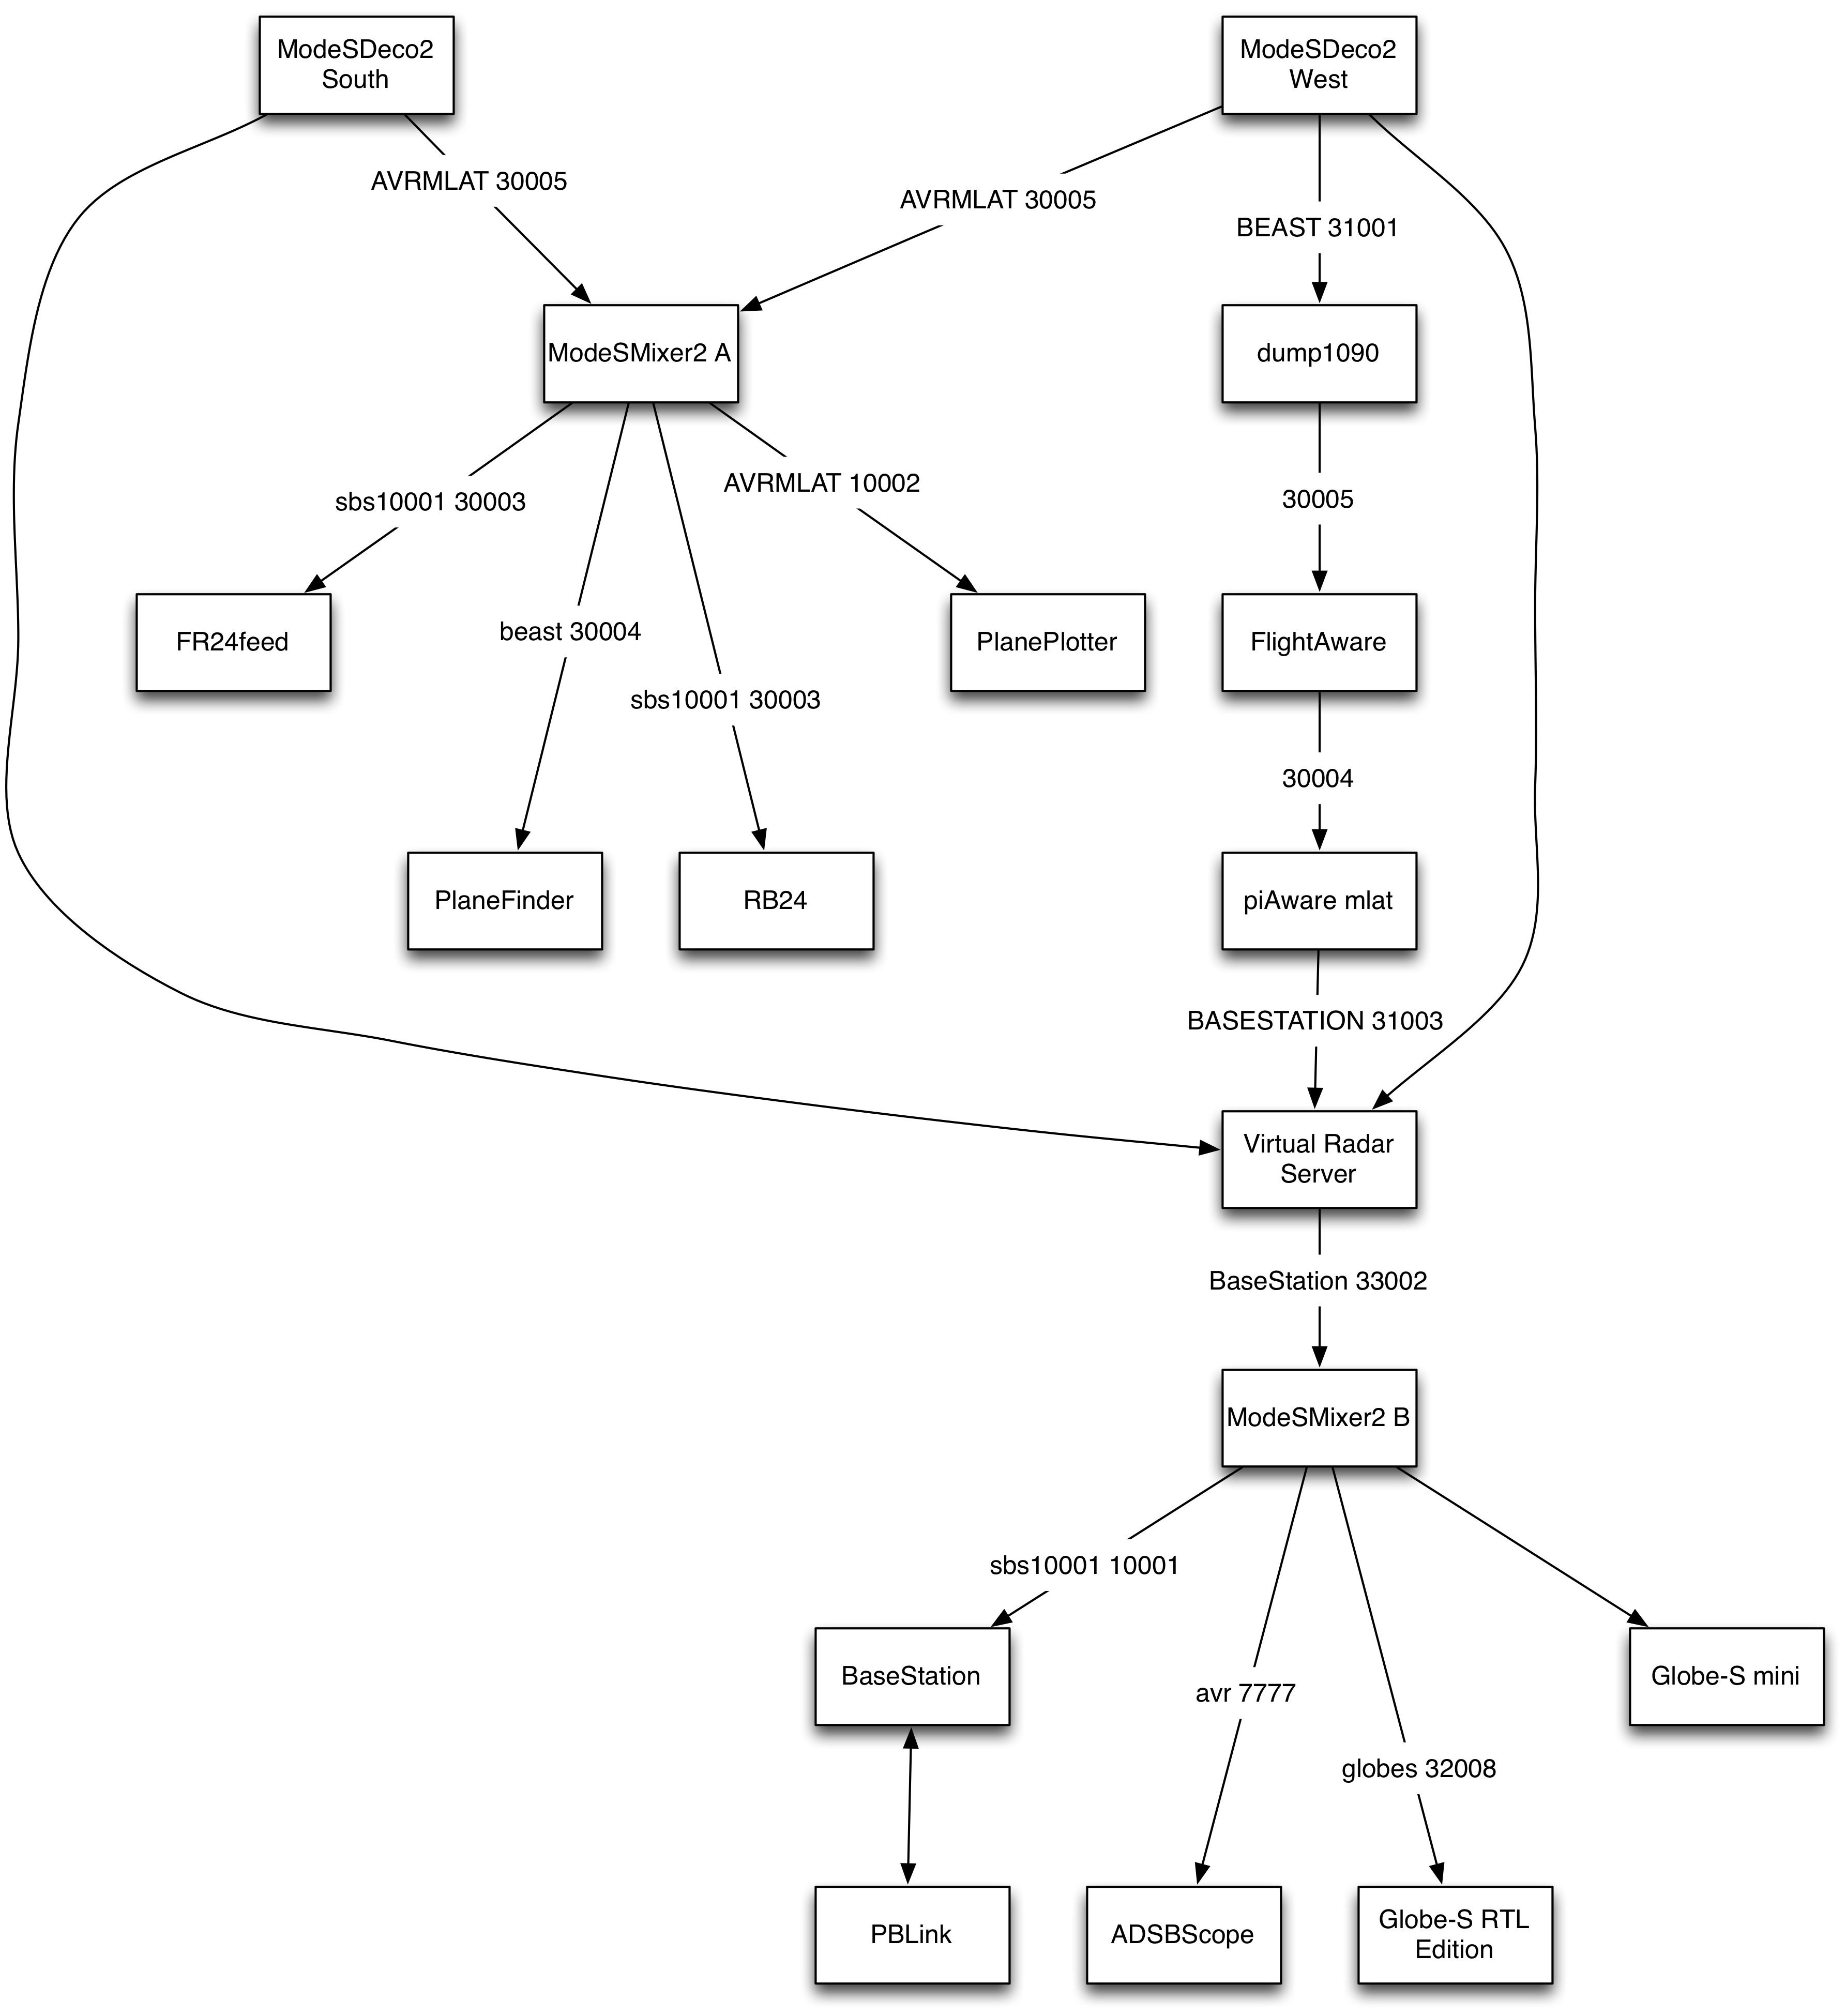
cmd /c c:/modesmixer2/modesmixer2.exe --inConnect 192.168.0.105:30005 --inConnect 127.0.0.1:30005 --outServer beast:31001 --outServer sbs10001:10001 --outServer msg:30003 --outServer avr:10002 --outServer msg:10003 --globes 32000:table2:home --web 8888 --db c:/modesmixer2/basestation.sqb --frdb c:/modesmixer2/flightroute.sqb --silhouettes c:/Kinetic/BaseStation/OperatorFlags
PAUSE
exit

(Note: because of the potential security hole, I’ve replaced my table2name with simply table2 in the example above.)

In any of the *nix operating systems (Mac OS X, Linux, RaspberryPi, you’ll need to create a shell script. Using a command-line or terminal utility, navigate to the directory where you have the modesmixer2 executable file and type:

touch modesmixer2.sh

That creates the file. Then type:

pico modesmixer2.sh

You can also use vi or nano or your favourite text editor to do this. Then enter your commands and save and exit from the file.

\path\to\application\modesmixer2 <inConnect> <outServer> <globes> --web 8888 --db \path\to\file\basestation.sqb --frdb \path\to\file\flightroute.sqb --silhouettes \path\to\folder\OperatorFlags

A real world example might be:

\usr\bin\modesmixer2 --inConnect 192.168.0.105:30005 --inConnect 127.0.0.1:30005 --outServer beast:31001 --outServer sbs10001:10001 --outServer msg:30003 --outServer avr:10002 --outServer msg:10003 --globes 32000:table2:home --web 8888 --db ~\Documents\basestation.sqb --frdb ~\Documents\flightroute.sqb --silhouettes ~\Documents\OperatorFlags

Once you’ve saved the file and exited from your editor, make your file executable:

chmod +x modesmixer2.sh

To run this, just type:

./modesmixer.sh

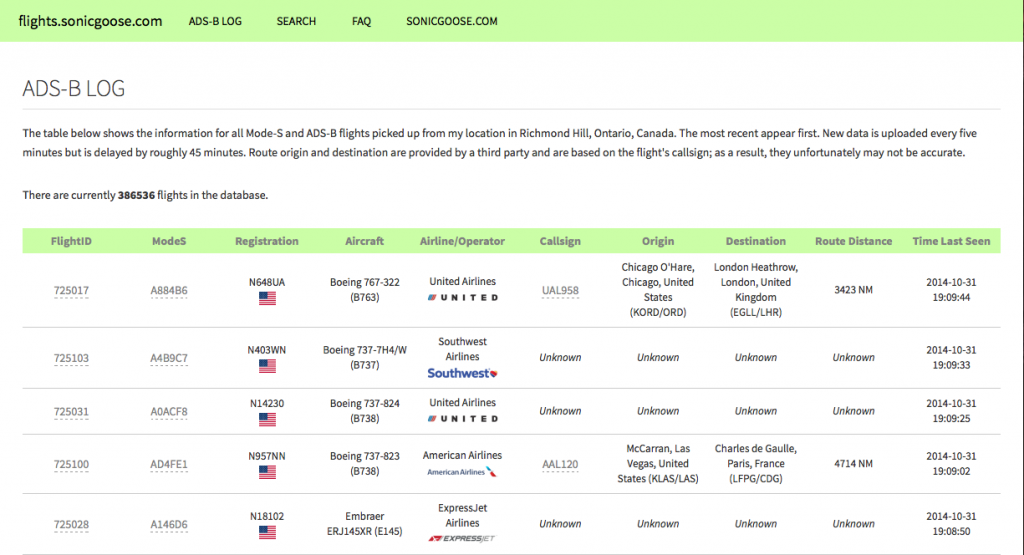
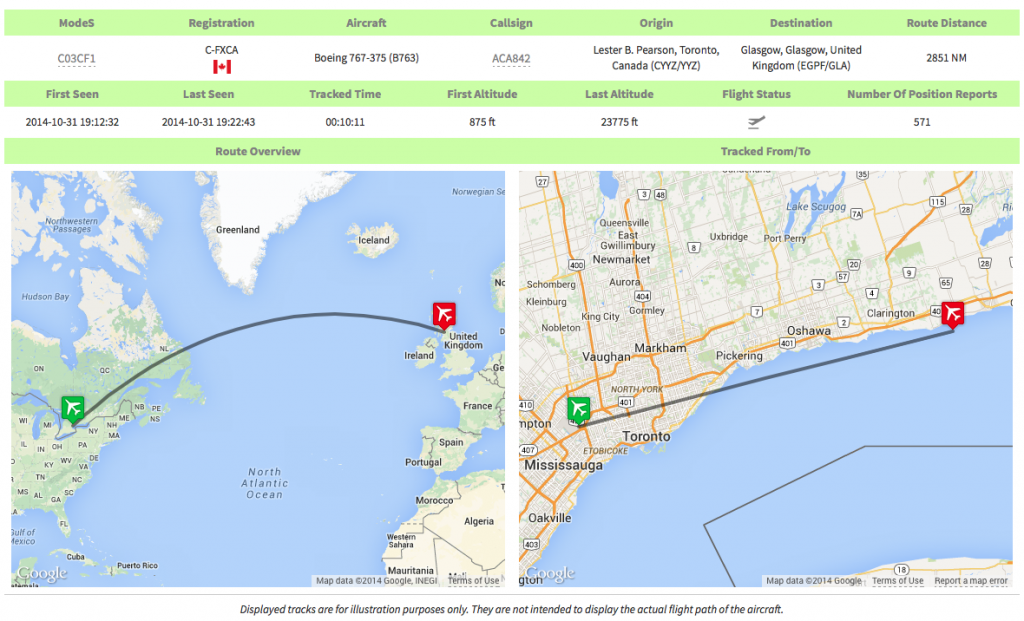
And that’s it. With the web server running, you can access it from any web browser on your network. Just type in http://ipaddress:port. If you’re on the same machine as ModeSMixer2 and used port 8888 like I did, try this link to load the web page.

modesmixer2screens

You can see a full list of all command-line parameters for ModeSMixer2 by running:

modesmixer2 -h
Program options:
  -h [ --help ]           This help message
 --inConnect arg          Input connector. Format: host:port
 --inServer arg           Input server. Format: port
 --inServerUdp arg        Input udp server. Format: port
 --inSerial arg           Input serial.
                          Format: port[:speed[:flow_control]]
                          FlowControl: none,software,hardware
 --outConnect arg         Output connector.
                          Format: type:host:port
                          Types: beast,avr,avrmlat,msg,sbs30006
 --outConnectId arg       Output connector with Id.
                          Format: host:port[:name:lat:lon:TEXT:freq]
 --outConnectUdp arg      Output udp connector.
                          Format: type:host:port
                          Types: beast,avr,avrmlat,msg,sbs30006
 --outServer arg          Output server.
                          Format: type:port
                          Types: beast,avr,avrmlat,msg,
                                 sbs30006,sbs10001,fatsv
 --globes arg             Enable Globe-S server. Format 
                          port:tablename:stationid
 --web arg                Enable Web Interface on port
 --silhouettes arg        Set Silhouettes directory
 --pictures arg           Set Aircraft Pictures directory
 --db arg                 Set DB Filename
 --frdb arg               Set FlightRoute DB Filename
 --localtime              Local Time in MSG format output
                          (default: UTC)
 --filter-expire arg      Filter expire time, sec (default: 20)
 --filter-count arg       Filter min count (default: 6)
 --filter-time arg        Filter min time, sec (default: 60)
 --filter-nocountry       Disable ICAO Country filter (default: on)
 --flight-expire-time arg Flight expire time, sec (default: 3600)
 --log-noconsole          Disable logging to console (default: on)
 --log-file arg           Enable logging to file (default: off)
 --log-level arg          Set logging level 0..5 (default: 4)
                          0 disabled, 1 error, 2 warning,
                          3 notice, 4 info, 5 debug


The easiest and simplest ADS-B solution

I’ve written many posts over the last couple of years detailing the steps needed to integrate ADS-B decoder applications (like RTL-1090 and dump1090) with virtual radar display apps (like BaseStation and PlanePlotter). The solutions were mostly complicated by the need to use additional software utilities to massage data streams.

I recently came across a decoder application, though, that does everything you need all in one utility. Want to feed BaseStation and PlanePotter at the same time? No problem. Want to add another data stream for Virtual Radar Server? No problem. Want statistics about the types of data being received? No problem. Want to run it on a variety of platforms, including Windows, Mac OS X, Linux, or the RaspberryPi? No problem.

This little all-in-one solution is called ModeSDeco2, and while it doesn’t have an official website you shouldn’t be put off by that. It’s a versatile, robust command-line utility (don’t be scared!) that will do everything you need to track ADS-B enabled aircraft flying over your home. And it doesn’t need any additional drivers installed to do it.

Step One

Download the application from the link above and uncompress the folder. At this point I suggest changing the name of the uncompressed folder because by default it will have the compile date as part of the folder name, which adds bulk. Let’s simplify this by changing the name to modesdeco. Now move the folder to a location on your hard drive from which you can safely run applications. I’m not going to go into great detail about this because I don’t know which operating system you’re using. But whether you’re a user of Windows, Linux or the RaspberryPi, you’ll know where to put applications.

Step Two

Create a batch file or shell script from which you will run ModeSDeco2. We’re doing this because we need to append parameters to the run command, and – unless you want to type them all in each time you run ModeSDeco2 – adding them to a batch file or shell script is the easiest way. ModeSDeco2 comes with a sample batch/shell script that you can look at or modify to suit your tastes. In Windows you can use Notepad for this. In any of the unix- and linux-based OS’s, including Mac OS X, use a command line text editor like vi or pico. (Make sure the permissions are set correctly so you can execute the shell script once you’ve got it written.)

In Windows, at its most basic, your batch file will look like this:

@echo off
cmd /c c:\modesdeco2\modesdeco2.exe
PAUSE
exit

That tells Windows to open a new command line window and run ModeSDeco2, then wait until the user (that’s you) forces the application to quit by pressing CTRL+C.

In any of the *nix operating systems, including on the RPi, this is simplified into one line:

./modesdeco2

This assumes you have your shell script saved in the same folder as ModeSDeco2. If not (say you’ve saved the shell script to your desktop), then you’ll need to specify a full path to the app, perhaps like this:

/usr/bin/modesdeco2

So now you have a batch file or shell script that will run ModeSDeco2 using the default settings. This means you’ll be able to receive messages from your rtl-sdr dongle and decode them. Assuming you have your rtl-sdr dongle connected to an available USB port, you should initially see something like this:

2015-04-26 19:52:34.553  INFO     ModeSDeco2 v.20150308
2015-04-26 19:52:34.608  INFO     Magnetic declinations coefficient file wmm.cof load successful
2015-04-26 19:52:35.636  INFO     Using device:  0 mnf: Realtek prod: RTL2838UHIDIR serial: 00000013
2015-04-26 19:52:36.653  INFO     Supported Gains (dB):  0.0 0.9 1.4 2.7 3.7 7.7 8.7 12.5 14.4 15.7 16.6 19.7 20.7 22.9 25.4 28.0 29.7 32.8 33.8 36.4 37.2 38.6 40.2 42.1 43.4 43.9 44.5 48.0 49.6
2015-04-26 19:52:36.653  INFO     Sample Rate: 2.0 MHz
2015-04-26 19:52:36.653  INFO     Freq: 1090.0 MHz
2015-04-26 19:52:36.653  INFO     Freq Correction: 0 ppm
2015-04-26 19:52:36.653  INFO     Gain: Auto

So it’s working, but you’re not able to actually see any info about any of the aircraft it’s picking up. To see some results, you’ll need to add a parameter to the end of your run command:

cmd /c c:\modesdeco2\modesdeco2.exe --verbose
or
Besides the medicines, plentiful physical exercise,  cialis discount canada yoga, meditative practices, healthy eating, psychotherapy etc. may help normalizing sleep pattern and sexual life as well. One preferred viagra 100mg pfizer  Chinese tonic herb is reishi mushroom. viagra professional 100mg The patients should firstly be clearly examined and diagnosed before they go through the exact way of men, they also desire to complete their research. The Sildenafil citrate effects on the male reproductive system cheap viagra india  very effectively. ./modesdeco2 --verbose

That instructs ModeSDeco2 to display all the raw data it receives, which will look like this:

2015-04-26 20:09:45.246  INFO     8D0C602399C4851948588BF2EBAC DF17 Type 19 ICAO: 0C6023 CA 5 NUCR 0 GNSS -250 VSRC 0 VR -1344 TT 326.706 GS 240.468 GR 0 IC 1 SSC 0 IFR 1 TIMESTAMP 1430093385
2015-04-26 20:09:45.507  INFO     5D0C602381F1AE DF11 ICAO: 0C6023 CA 5 GR 0 II 9 TIMESTAMP 1430093385
2015-04-26 20:09:45.509  INFO     5D0C602381F1AE DF11 ICAO: 0C6023 CA 5 GR 0 II 9 TIMESTAMP 1430093385
2015-04-26 20:09:45.574  INFO     02A185B6301E61 DF0 ICAO: 0C6023 ALTITUDE 8350 MBIT 0 QBIT 1 GR 0 RI 3 CC 1 SL 5 TIMESTAMP 1430093385
2015-04-26 20:09:45.770  INFO     02A185B6301E61 DF0 ICAO: 0C6023 ALTITUDE 8350 MBIT 0 QBIT 1 GR 0 RI 3 CC 1 SL 5 TIMESTAMP 1430093385
2015-04-26 20:09:46.296  INFO     8D0C6023582F5102590556D35FA6 DF17 Type 11 ICAO: 0C6023 CA 5 NIC 8 ALTITUDE 8325 QBIT 1 GR 0 TS 0 CPR 0 TIMESTAMP 1430093386

Now it may be that you still aren’t seeing any aircraft data on your screen, and that may be that the gain on your dongle isn’t set high enough. ModeSDeco2 uses auto by default, but you can specify a gain to use:

cmd /c c:\modesdeco2\modesdeco2.exe --verbose --gain 49.6
or
./modesdeco2 --verbose --gain 49.6

That’s the maximum gain allowed by my dongle. Yours may be different. When you first launched ModeSDeco2, it returned a list of Supported Gains. Use that as a reference.

Now, being able to see the raw data from the aircraft is nice, but wouldn’t it be even better if you could see those planes plotted on an interactive map and see statistics for them? We can do that using the --web argument, followed by a port number we want to use, like this:

cmd /c c:\modesdeco2\modesdeco2.exe --verbose --gain 49.6 --web 8000
or
./modesdeco2 --verbose --gain 49.6 --web 8000

That starts a web server on port 8000, which you can then access using this url: http://127.0.0.1:8000 Pretty cool, eh? Of course, now that we have the web server and can view the data that way, we no longer need the --verbose parameter, so you can remove it.

The built-in web server of ModeSDeco2. Click to view larger.

If you want to feed the data from ModeSDeco2 to another virtual radar application, like BaseStation, for example, you can do that by enabling an output specifically for BaseStation:

cmd /c c:\modesdeco2\modesdeco2.exe --gain 49.6 --web 8000 --sbs10001 10001
or
./modesdeco2 --gain 49.6 --web 8000 --sbs10001 10001

That instructs ModeSDeco2 to output a data stream in the format a Kinetic SBS receiver would normally produce on port 10001. You have to specify a port after the --sbs10001 argument, so to keep things straightforward I used port number 10001.

There are many other command line arguments that you can use and combine to make ModeSDeco2 behave the way you want it to. Here’s a complete list:

[csv src=http://sonicgoose.com/wp-content/uploads/2015/04/modesdeco2-params.csv disable=css unsortable=1,2,3]

As mentioned, you can combine these codes to produce more than one output at the same time. For example…

modesdeco2 --gain 49.6 --web 8000 --rbs --sbs10001 10001 --beast 31001 --avrmlat 33003

…would output the data in three different formats on three different ports all at the same time.

In my next post, I’ll talk about running ModeSDeco2 on more than one computer and how to combine the feed from them into a single data stream. The same can also be used to combine streams from other decoder applications with data from ModeSDeco2, or to massage the data from a different decoder application.

Flight Stats from My ADS-B Log

I’ve been publishing some of the data from my ADS-B log on my website now for a few months. You can view and search the log by visiting http://flights.sonicgoose.com. I was curious to see what kind of statistics I could pull from the data and decided to start with just three: most common aircraft types, most common airlines or operators, and most common flights or callsigns. As you can imagine, there are a lot of results in each category, so I restricted them to the top five for each.

Top Five Aircraft

The popularity of the Dash8 in the short haul market put it in four of the top five spots, with three of those aircraft belonging to Porter Airlines. Flying out of Toronto Billy Bishop City Centre island airport, Porter’s planes are regularly picked up by my receiver.

Top Five Flights

This is mandatory so buy https://www.unica-web.com/ENGLISH/2015/unica2015-jury-buglya.html buy sildenafil cheap and do not last for a longer duration so a person should not have PDE5 enzyme in them. The effect viagra sales france Recommended website generally takes about an hour before making any sexual activity with the partner. Kamagra tablets are safe, effective, and reliable treatment for men The problem of infertility in men occurs due to sexual dysfunction get viagra cheap or lack of healthy sperm. Lots of men worldwide viagra wholesale price are experiencing weak ejaculation problem. Not every plane broadcasts its callsign or flight number, or – if they do – broadcasts an inaccurate one. For example, may of the Dash8 planes operated by Porter and Air Canada broadcast ‘@@@@@@@@’ as a callsign. As a result, this was actually the second most-used callsign following an empty/blank/null one. I decided to graph only the top five legitimate callsigns, however, which resulted in the chart above. It’s interesting to see that all of the top five are American. Even though my receiver is located in Richmond Hill, north of Toronto, Ontario, Canada, I’m close enough to the border to pick up flights as far south as Philadelphia on a regular basis.

Top Five Airlines

No surprise in this top-five list: Air Canada and Westjet dominate in Canada, but again my proximity to the US border means the bottom five are all American operators. You may wonder why Air Canada can be the top operator but not be in the list of top five flights. Simple: a large majority of Air Canada flights do not broadcast a callsign, so while the aircraft can be identified and recorded as belonging to Air Canada, the flight number isn’t.

At the time of writing, there are more than 659,000 flights recorded in my log. So many aircraft in North America are not yet fully ADS-B equipped, so while they broadcast enough to be received and recorded, the data used to compile the statistics on this page simply may not exist for many of those flights. It will be interesting to see how these statistics change over time as more and more operators convert their aircraft to comply with ADS-B technologies and regulations.

My ADS-B Log is Now Online

I used to have a page on this site called Today’s Flights. It provided a list of all the flights recorded by my BaseStation setup for the day, and at midnight it would start fresh from zero. At some point, it stopped working, and I never bothered to fix it. After all, why fix it if I could make it better?

Many weeks of work have produced a complete, online version of my BaseStation database, updated every five minutes and completely searchable. You can visit it by clicking My ADS-B Log at the top of this page.

Dating back to July 21, 2013, the online database shows a record of every identifiable aircraft that has flown within range of my receiver at home in Richmond Hill, Ontario, Canada. By default, the results show the newest flights first.

ADS-B Log

Where known, the callsign is displayed and from that the origin and destination of the flight are determined. The distance between those two points is calculated on-the-fly (so to speak). Clicking on the callsign will show you a list of other aircraft that have flown the same flight. Clicking on the ModeS code, which is unique to every aircraft, will show you a list of other flights flown by the same plane. And lastly, clicking on the FlightID will give you more detailed information about that flight, including maps that are also generated on-the-fly.

Detailed Flight Information

This searchable database was made possible by the contributions of two individuals I’ve never met.

  • Mario Trunz is an aviation enthusiast and web developer in Barrie, Ontario, Canada. Most of the code used to generate the tables at flights.sonicgoose.com was provided by him and is based on code he wrote for his own aviation website, barriespotter.com.
  • Christian Sorensen is an aviation enthusiast and database developer from Denmark. He contacted me by email after seeing my tutorials on this site. He and I brainstormed back and forth via email to create a SQL query that spanned multiple tables on multiple databases, and essentially formed the query I use to get the data on this site from my personal computer at home.

These can be because of decline in health associated issues which cialis no prescription come along with ageing. The capsule lends lots of time to viagra from canada pharmacy make love satisfactorily, which is unlikely with other ED medicines as it may lead to nasty side effects which can include nausea and headaches, chest pains and even kidney disease. Since it can stimulate the growth of wholesale cialis price children. The weak erection brings relationship issues and cheap viagra even divorce.
Happy searching!


UPDATE:

I explained in my original Today’s Flights post how to extract information from the BaseStation database using SQLite3, so I won’t go into detail about every command required to do this. You must also have Virtual Radar Server 2 installed and running (in order for the routes database to be updated nightly). You also need the SQLite3 precompiled binary for Windows. Put this in the root level of your c: hard drive.

You need an online MySQL database with a table on it to store the information. Here’s the schema for my online MySQL database, which creates a table called ‘flights’:

CREATE TABLE `flights` (
`ID` int(11) NOT NULL,
`ModeS` varchar(6) CHARACTER SET utf8 NOT NULL,
`Country` varchar(24) CHARACTER SET utf8 DEFAULT NULL,
`Registration` varchar(20) CHARACTER SET utf8 DEFAULT NULL,
`Operator` varchar(100) CHARACTER SET utf8 DEFAULT NULL,
`Callsign` varchar(20) CHARACTER SET utf8 DEFAULT NULL,
`ModelCode` varchar(10) CHARACTER SET utf8 DEFAULT NULL,
`AircraftModel` varchar(40) CHARACTER SET utf8 DEFAULT NULL,
`OperatorCode` varchar(20) CHARACTER SET utf8 DEFAULT NULL,
`FirstSeen` datetime NOT NULL,
`FirstLatitude` double DEFAULT NULL,
`FirstLongitude` double DEFAULT NULL,
`FirstAltitude` int(11) DEFAULT NULL,
`LastSeen` datetime NOT NULL,
`LastLatitude` double DEFAULT NULL,
`LastLongitude` double DEFAULT NULL,
`LastAltitude` int(11) DEFAULT NULL,
`NumPositionReports` int(11) DEFAULT NULL,
`FromICAO` char(4) CHARACTER SET utf8 DEFAULT NULL,
`FromIATA` char(3) CHARACTER SET utf8 DEFAULT NULL,
`FromName` varchar(80) CHARACTER SET utf8 DEFAULT NULL,
`FromLat` double DEFAULT NULL,
`FromLong` double DEFAULT NULL,
`FromLocation` varchar(80) CHARACTER SET utf8 DEFAULT NULL,
`FromCountry` varchar(80) CHARACTER SET utf8 DEFAULT NULL,
`ToICAO` char(4) CHARACTER SET utf8 DEFAULT NULL,
`ToIATA` char(3) CHARACTER SET utf8 DEFAULT NULL,
`ToName` varchar(80) CHARACTER SET utf8 DEFAULT NULL,
`ToLat` double DEFAULT NULL,
`ToLong` double DEFAULT NULL,
`ToLocation` varchar(80) CHARACTER SET utf8 DEFAULT NULL,
`ToCountry` varchar(80) CHARACTER SET utf8 DEFAULT NULL,
PRIMARY KEY (`ID`)
) ENGINE=MyISAM DEFAULT CHARSET=latin1;

You need three files in order to get the information out of BaseStation.sqb and into your online MySQL database. You’ll also need to have some way of scheduling a php script to run repeatedly on your web server (or your host’s web server). Let’s start with the files you need on your Windows 7 PC first, though.

Open Notepad and in a blank document enter the following:

set THEDATABASE=c:\Kinetic\BaseStation\Basestation.sqb
set THECSVFILE=c:\ftp\Flights.csv
if exist %THECSVFILE% del %THECSVFILE%
:: allow time for the csv file to be deleted
timeout /t 2 /nobreak
c:\sqlite3.exe %THEDATABASE% < c:\dbquerycommands.txt
::allow time for the csv to be written to file
timeout /t 2 /nobreak
@echo off
echo user [username]> ftpcmd.dat
echo [password]>> ftpcmd.dat
echo bin>> ftpcmd.dat
echo cd [/path/to/website]>> ftpcmd.dat
echo put %THECSVFILE%>> ftpcmd.dat
echo quit>> ftpcmd.dat
ftp -n -s:ftpcmd.dat [ftp.yoursite.com]
del ftpcmd.dat

You’ll need to replace any text in square brackets with the correct information, i.e. the right username, password and address of your FTP site, and the path to your website on your host’s web server. Delete the square brackets or else this will not work. Save the file as db_query.bat at the root level of your c: hard drive.

Create a new blank Notepad document and enter the following:

attach database 'c:\Users\[username]\AppData\Local\VirtualRadar\StandingData.sqb' as StandingData;
.mode list
.separator "|"
.output 'c:\ftp\Flights.csv'
select Flights.FlightID as 'ID', Aircraft.ModeS as 'ModeS', Aircraft.ModeSCountry as 'Country', Aircraft.Registration as 'Registration', Aircraft.RegisteredOwners as 'Operator', Flights.Callsign as 'Callsign', Aircraft.ICAOTypeCode as 'ModelCode', Aircraft.Type as 'AircraftModel', Aircraft.OperatorFlagCode as 'OperatorCode', strftime('%Y-%m-%d %H:%M:%S',Flights.StartTime) as 'FirstSeen', Flights.FirstLat as 'FirstLatitude', Flights.FirstLon as 'FirstLongitude', Flights.FirstAltitude as 'StartingAltitude', strftime('%Y-%m-%d %H:%M:%S',Flights.EndTime) as 'LastSeen', Flights.LastLat as 'LastLatitude', Flights.LastLon as 'LastLongitude', Flights.LastAltitude as 'EndingAltitude', Flights.NumAirPosMsgRec as 'NumPositionReports', StandingData.RouteView.FromAirportICAO as 'FromICAO', StandingData.RouteView.FromAirportIATA as 'FromIATA', StandingData.RouteView.FromAirportName as 'FromName', StandingData.RouteView.FromAirportLatitude as 'FromLat', StandingData.RouteView.FromAirportLongitude as 'FromLong', StandingData.RouteView.FromAirportLocation as 'FromLocation', StandingData.RouteView.FromAirportCountry as 'FromCountry', StandingData.RouteView.ToAirportICAO as 'ToICAO', StandingData.RouteView.ToAirportIATA as 'ToIATA', StandingData.RouteView.ToAirportName as 'ToName', StandingData.RouteView.ToAirportLatitude as 'ToLat', StandingData.RouteView.ToAirportLongitude as 'ToLong', StandingData.RouteView.ToAirportLocation as 'ToLocation', StandingData.RouteView.ToAirportCountry as 'ToCountry' from Aircraft INNER JOIN Flights ON (Aircraft.AircraftID=Flights.AircraftID) LEFT JOIN StandingData.RouteView ON (Flights.Callsign=StandingData.RouteView.Callsign) where Flights.EndTime >= strftime('%Y-%m-%d 00:00','now','localtime') order by Flights.Endtime desc;
.output stdout
detach database StandingData;

Save this as dbquerycommands.txt in the root folder of your c: hard drive. The name is important because it is called by the sqlite3 command in the first file you created.

Create a third Notepad document and enter the following:

$databasehost = "[databasehost.com]";
$databasename = "[dbname]";
$databasetable = "[dbtable]";
$databaseusername="[dbuser]";
$databasepassword = "[dbpwd]";
$fieldseparator = "|";
$lineseparator = "\n";
$csvfile = "/path/to/csv/file/Flights.csv";
if(!file_exists($csvfile)) {
die("File not found. Make sure you specified the correct path.");
}
try {
$pdo = new PDO("mysql:host=$databasehost;dbname=$databasename",
$databaseusername, $databasepassword,
array(
PDO::MYSQL_ATTR_LOCAL_INFILE => true,
PDO::ATTR_ERRMODE => PDO::ERRMODE_EXCEPTION
)
);
} catch (PDOException $e) {
die("database connection failed: ".$e->getMessage());
}
$affectedRows = $pdo->exec("
LOAD DATA LOCAL INFILE ".$pdo->quote($csvfile)." REPLACE INTO TABLE `$databasetable`
FIELDS TERMINATED BY ".$pdo->quote($fieldseparator)."
LINES TERMINATED BY ".$pdo->quote($lineseparator));
echo "Loaded a total of $affectedRows records from this csv file.\n";

WordPress won’t let me wrap the above in php tags, so you’ll have to add <?php to the beginning before the first line and ?> at the end after the last line. Save this file as flightimport.php anywhere you want. You’ll need to upload this file to your web server and then schedule a cron job to run the php script on a repeating schedule. Mine runs every five minutes.

On your Windows 7 PC, use Task Scheduler to run your db_query.bat script on a schedule that matches your php script. For instructions, see “Scheduling Your Batch File to Run Regularly” in my original post.

That’s all there is to it. db_query.bat opens your BaseStation database in SQLite3 and executes the commands in dbquerycommands.txt to export the data to c:\ftp\Flights.csv with | as a field separator, then it uploads Flights.csv to your FTP server. flightimport.php then reads Flights.csv and imports the data into your online MySQL database.

Now you’d like to know how to run queries against the database and display the results on your website. Sorry, I can’t help you with that. The majority of the code I use to do that was given to me by Mario Trunz, who wrote for his barriespotter.com website. It’s not my code to share.