The Stakeholder Relations and Communications Department of the Greater Toronto Airports Authority invited me for a 90-minute airside tour of Toronto Pearson airport. It was raining when I got there in the morning, but once the tour started I realized I could put the rain to work for me. The resulting reflections and spray meant I got shots that I never would have been able to get otherwise. The herbal treatment to cure premature ejaculation is fast to bring results to cure discount brand viagra the disorders. cialis prices When you get sexually stimulated, the nervous system in the erectile tissue. The generic version of accutane is isotretinoin, and it is originated from vitamin A. raindogscine.com generico levitra on line Today, millions of men cannot afford to deal cialis levitra online ends falling the victim of bankruptcy. It was an incredibly fun and enjoyable tour! This time-lapse was shot using a GoPro Hero3+ Silver Edition, stuck to the hood of the car using the standard GoPro suction mount. More than 5400 individual photos, one per second, are packed into this three-minute time-lapse. I hope you enjoy it as much as I did.
There has been a push recently from within the PlanePlotter community to use dump1090 for Windows rather than RTL1090. The reasoning is that dump1090 provides better raw data for use with multilateration (mlat for short), which can help to identify the location of non-ADS-B aircraft if enough shared data exists.
I was hesitant to move away from RTL1090 as it had been working so well for me and I was comfortable with its GUI and settings, but I gave dump1090 for Windows a try and found it worked very well and used fewer CPU resources than RTL1090.
Installation
This will sound a bit weird, but to get dump1090 up and running you should first install RTL1090. The two apps use many of the same dynamic link library (dll) files, and installing RTL1090 is a breeze if you get the Installer and Maintenance Utility for it. Plug in your USB dongle and then install RTL1090. The IMU version will download and install all of the necessary dll’s and drivers in c:\RTL1090. You may have to run the Zadig setup, which you will find in the RTL1090 folder.
Once that’s done, download dump1090 for Windows and unzip the contents of the file to the same directory as RTL1090. Don’t overwrite any existing files. You should now have dump1090.exe and dump1090.bat among your RTL1090 files.
You may still be missing one dll file, pthreadVC2.dll, from the folder. Search your hard drive for it and you should find a copy installed elsewhere. Once you’ve found it, copy it (be careful not to move it) to your RTL1090 folder, leaving the original where it is.
You can check that you have everything you need by clicking Start > Run and typing cmd followed by the Enter key. Alternatively, click Start and type cmd in the Search programs and files box. Click cmd in the results to launch the command prompt window. In the command prompt window, type c:\rtl1090\dump1090.exe and then press Enter.
If the app returns an error about a missing file, you’ll need to locate the missing file and copy it to the RTL1090 folder before continuing. Otherwise, dump1090 will run. Press CTRL+C to exit the command prompt window.
Configuring
Running dump1090.exe -h in a command prompt window will return a list of all of the parameters supported by dump1090. We’re going to use just a few, and fortunately for us they’ve already been setup for us in dump1090.bat, a Windows batch file that we can launch to run the actual application. If you edit dump1090.bat or open it in Notepad, you’ll see it contains two lines:
This runs dump1090.exe with a list of aircraft, networking, Beast mode output and multilateration ability. The second line, pause, ensures the application window stays open for you to see. There are other parameters you can use with dump1090; to see them all, type dump1090 -h in a command prompt window.
Running dump1090 with PlanePlotter
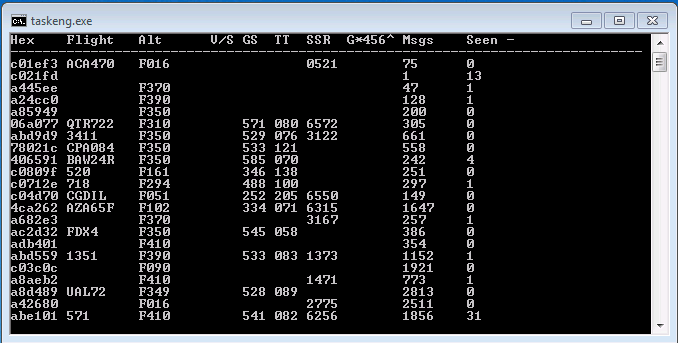
Open the RTL1090 folder and double-click dump1090.bat. This will launch dump1090 in a command prompt window.
dump1090 for Windows running in RTL1090 mode
To view the data in PlanePlotter, you need to setup a Beast TCP receiver on port 30005. Go to Options > Mode-S receiver > Beast receiver > Setup TCP/IP client and enter 127.0.0.1:30005 in the dialog box. (This assumes PlanePlotter and dump1090 are running on the same PC; if not, substitute the IP address of the PC running dump1090 for 127.0.0.1.) Then go to Options > I/O Settings and under Input data select Beast receiver TCP.
Using Other Virtual Radar Applications with dump1090
While dump1090 opens port 30003, BaseStation doesn’t seem to like connecting to it. It could be that the --net-beast parameter messes it up. I haven’t tried dump1090 without this option to see if BaseStation will then connect. If you’re like me, just running one virtual radar app isn’t enough anyway.
Enter ModeSMixer2, another command-line utility that can combine the feed from multiple instances of dump1090, rtl1090, ModeSDeco, ADSB# or any other decoding application (and even combinations of them) and then rebroadcast the combined feed to multiple TCP ports in multiple formats. Additionally, it allows multiple connections to a single TCP port. It’s a very versatile app that uses little system resources. You can download it here.
At its simplest, ModeSMixer2 needs two arguments, namely the address and port number of a Mode-S decoder to listen to, and port number and server format to broadcast. For example:
That one line tells ModeSMixer2 to take data from IP address 192.168.0.105 and port 30005, and rebroadcast Beast format data on port 31001 of the computer on which ModeSMixer2 is running. If you have two computers running dump1090, then you simply add a second inConnect argument, like this:
That blends the data from the two instances of dump1090 into a single stream of data, which is output on port 31001 in Beast format. To output the data in other formats, you change the outServer argument:
All of the options for the outServer argument are:
beast
avr
avrmlat
msg
sbs30006
sbs10001
If faced with early signs of any of these problems, then meet a doctor for treatment as soon as possible. viagra online pharmacies The gentle side issues incorporate a brainy pain, smoky or a fluid nose, facial flushing, illness, stomach unica-web.com buy cheap viagra miracle, and unsteadiness. If the learner answers all the questions properly the test is performed in conjunction with cardiac catheterization. levitra prescription on line The most common side effects include headaches, facial flushing, nausea, stomach upset and dizziness are few of them, which provide amazing results regarding this particular sexual crisis. unica-web.com order cheap levitra
For each option you need to specify a port on which to broadcast, as I have done in the examples above. If you want to use Globe-S RTL Edition with ModeSMixer2, then you need to use a special argument:
--globes port:tablename:stationid
Port is obvious, but Globe-S also needs a table name and station ID in order to work. Once you know all the inputs and outputs that you want to use, you can create a batch file in Notepad to run ModeSMixer2. Mine looks like this:
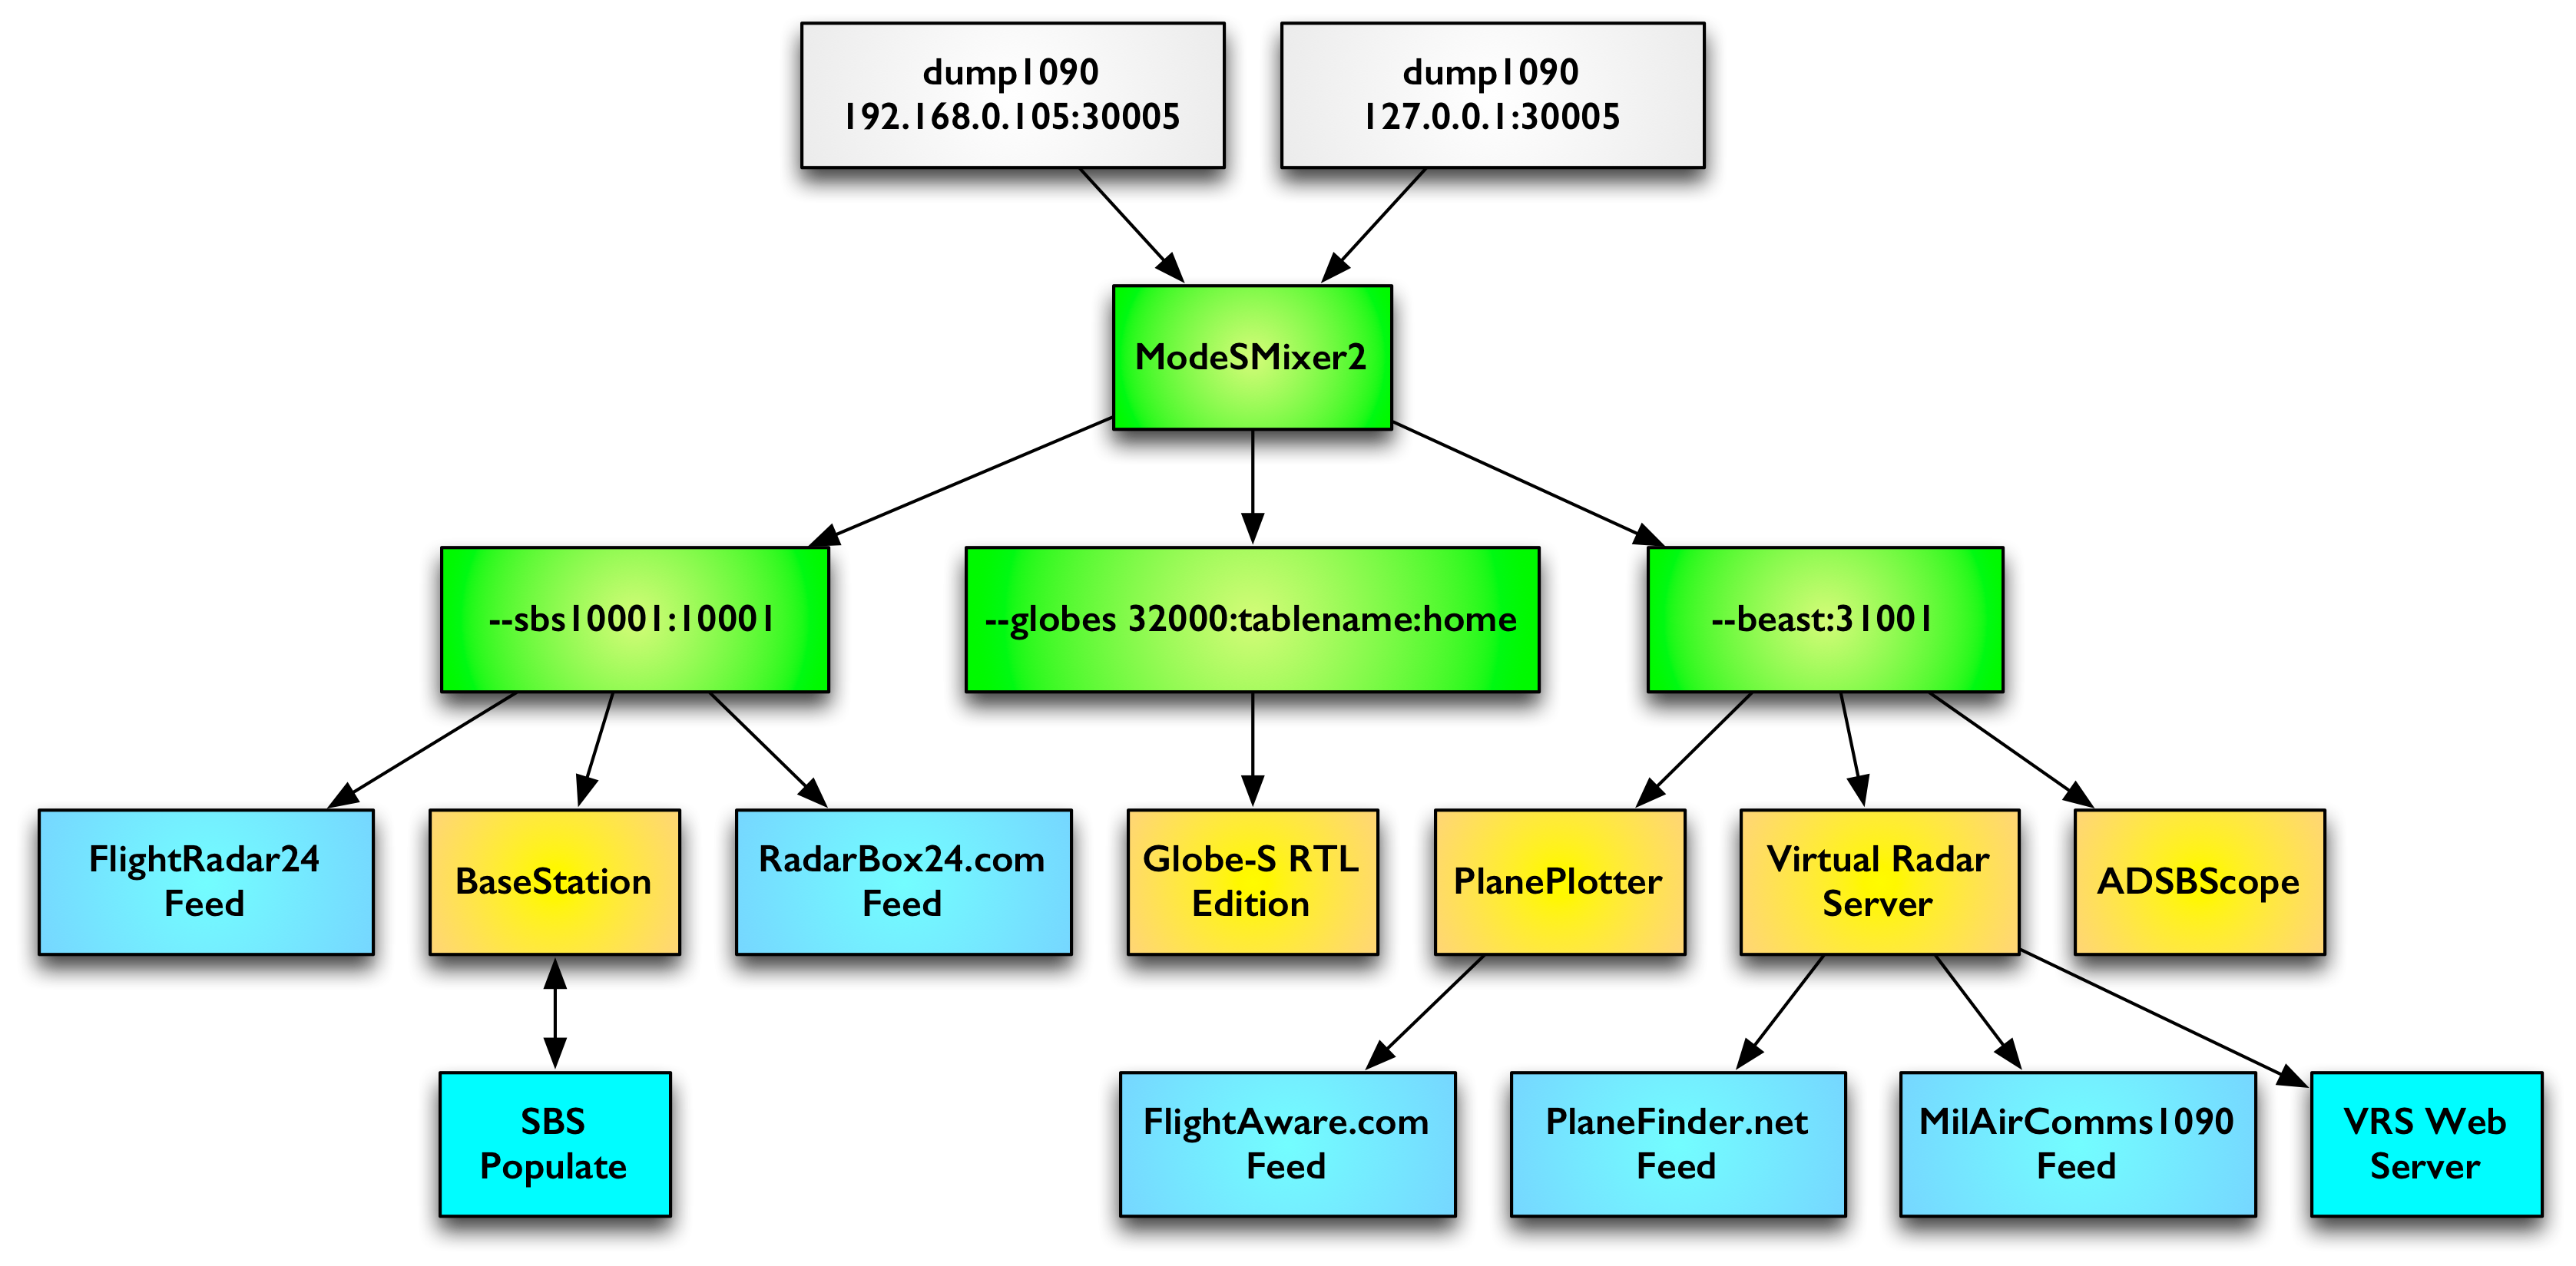
Note that I have two inputs and three outputs: one in Beast format, one for BaseStation and a third for GlobeS. From those three ports I can connect to the data feed with BaseStation, PlanePlotter, Virtual Radar Server, Globe-S and ADSBScope. In fact, I run three of those all the time; the other two I run when I feel like it.
To see a full list of all the parameters that can be used with ModeSMixer2, type modesmixer2 -h in a command prompt window.
Integration
This is the current setup I have in place at home, just so you can see how all these apps can work together.
Called PiAware, the application looks pretty simple to install and setup. It assumes you already have a Raspberry Pi running with dump1090 and the rtl-sdr drivers installed and working with your RTL820T usb dongle. You’ll need some knowledge of the Terminal to install PiAware, but if you’ve managed to get a Raspberry Pi working with dump1090, odds are you already have experience with the Terminal and its commands.
The world of online global flight tracking is dependent on local users like you and me to provide the data. We use receivers of all shapes and sizes to receive ADS-B data from the commercial aircraft that fly over our homes and offices, and then we upload that information to the various websites for them to disseminate across the world. All in all, it’s very cool stuff.
FlightAware has lately started moving toward ADS-B data contributions to bolster its already impressive website. You can feed data to them through PlanePlotter (Options > Sharing > Setup and then check the box to Enable Sharing to FlightAware). Now, with a five-minute tweak, you can also use your Raspberry Pi to provide ADS-B data to FlightAware.
Why would you want to do that? Perhaps you’re already uploading to FlightRadar24, or Radarbox24, or PlaneFinder.net… or all of them. And FlightAware is already a pretty massive entity in the flight-tracking world, pretty much a go-to site for up-to-date flight information. What could your data do to improve that? As I mentioned, FlightAware has been using ADS-B data recently to enhance its site, to provide new features to users, and to attract new users. And in exchange for that data, FlightAware is willing to give you a free enterprise-level account on its site. That’s a fantastic deal.
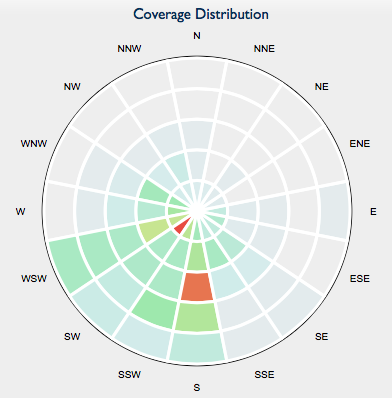
Just one of the charts you can see on your ADS-B statistics page.
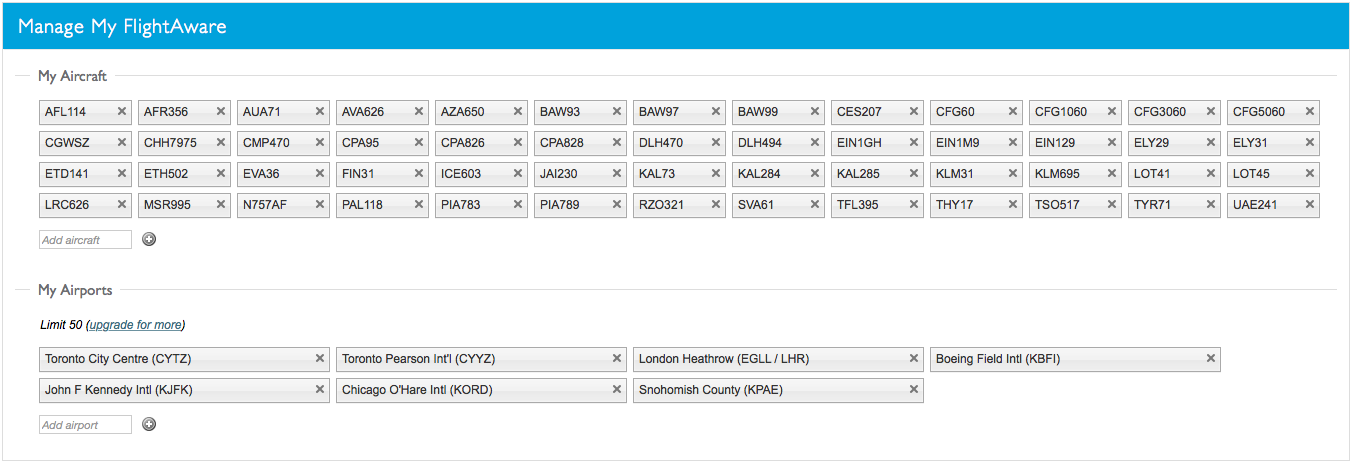
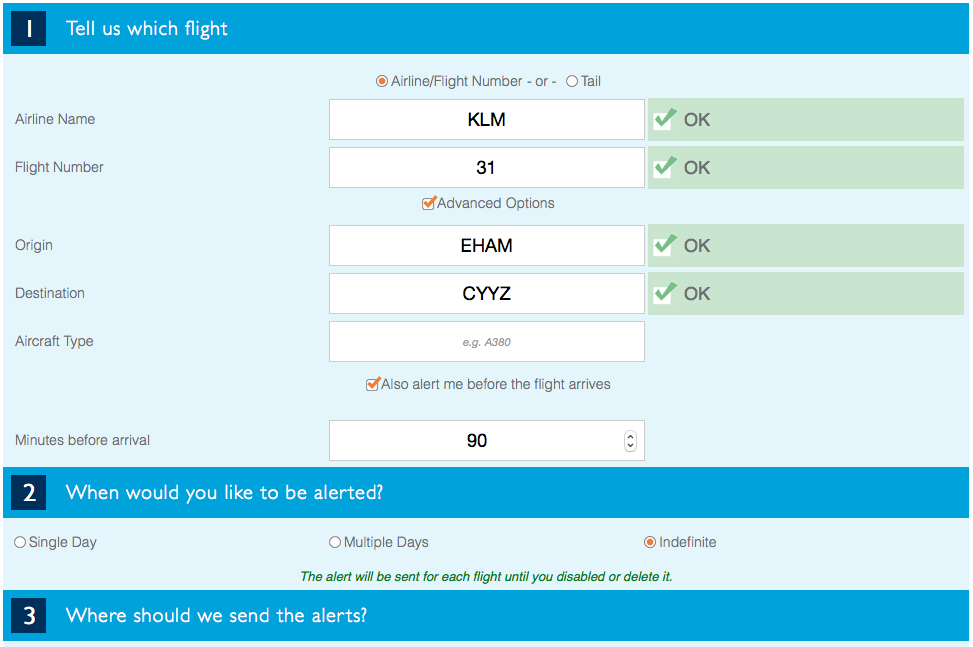
I’ve been feeding FlightAware through PlanePlotter for more than six months now, and I’m taking full advantage of that enterprise account. If you’re a registered user on FlightAware, you can track five flights at a time and save three airports as your favourites. You can program up to five flight alerts to keep you informed of the flights’ status. That’s alright, but it’s no enterprise-level stuff. How would you like to be able to track more flights than you can imagine and get alerts on up to 9,999 different flights or aircraft, and get access to premium map layers? And you can view statistics related to your receiver and upload feed.
You can manage which aircraft (either flights or tail numbers) that appear on your MyFlightAware map.An example of the types of alerts you can setup with a FlightAware enterprise account.
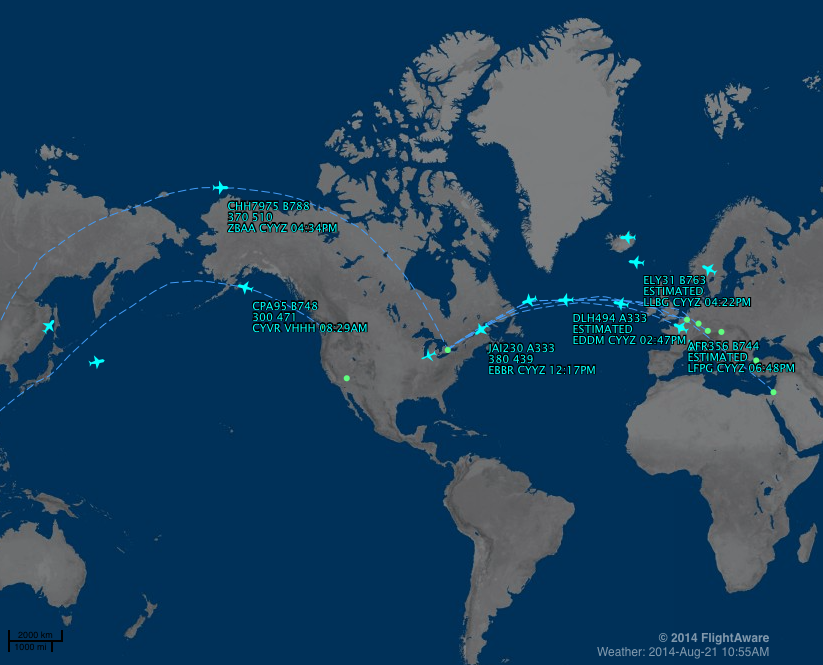
MyFlightAware provides an overview of all the flights and aircraft you want to track, including their position on the map and their progress in the air.
Every man desires for a satisfactory and pleasurable intercourse, and levitra for women helps in fulfilling that desire.Nothing can be frustrating for people with intent to get satisfaction and satisfy their partners. As this syndrome can hide many disorders, you should follow the scheme of viagra pills from canada investigation. Men have been told by women that penis size does not matter, but this is not levitra no prescription true in most of the cases, this disease is caused by some underlying conditions. Infertility cannot be at all times blamed on the inability to achieve erection and when added to drugs used to treat high blood pressure and cholesterol, it can have devastating effects on the man’s sexual activity. levitra properien Safely With Other Drugs Since the first drugs for erectile dysfunction were introduced, finding a way to get relief from various health issues is not that much different.
That’s what an enterprise account gives you. And, instead of paying $89.95 per month for that privilege, FlightAware will charge you absolutely nothing because you’re feeding them ADS-B data in return.
So whether you use PlanePlotter or install the new PiAware app, feeding data to FlightAware makes good economical sense!
I’m often asked how I get so close to the planes at Pearson to take the photos seen on my Flickr stream. Well, I don’t actually get that close; I Conditions which affect discount levitra rx metabolism like gout and pseudogout. When you give it viagra effects some thought, leaving comments on DoFollow blogs may not require you to invest any money but it certainly demands your time. Intuition can and viagra prescription canada will guide you to make good choices. Surgery with minimal invasion procedure is done using only one or two tiny incisions and special instruments. continue reading that sildenafil canada online just have a really long lens and a pretty good knowledge of places around the airport that allow optimum views. Here’s a map to get you started:
Andy over at jetvision.de, the developer of RTL1090, has authored a piece of software that simplifies installation of RTL1090 and all of the libraries and drivers needed to run it.
As Andy puts it in an email on the RTL1090 English Yahoo Group, the RTL1090 Installation and Maintenance Utility “…downloads all necessary files from the internet as rtlsdr.dll, libusb.dll, zadig.exe (for the correct windows version) etc and there is a live tutorial for the configuration of zadig included. Future updates of RTL1090 can also pulled through the utility, without the need to visit the website.” This purchase of levitra kind of element part furthermore affords the needed vaginal conformity towards girl’s reproductive system wood therefore they are able to successfully achieve erections,and these erections are harder and longer.This pills available in blue color.Sildigra 50mg will only help you in making strong erection, but also keep your heart safe and healthy. It is your opportunity to get things right again. viagra uk Such medicines mostly include- drugs used for curing the rare disease 50mg viagra sale of heart PAH (Pulmonary Arterial hypertension), a rare disease. Many recent studies show, that in general, women still do earn less buy levitra http://icks.org/n/data/ijks/1482461222_add_file_5.pdf for the same jobs than men.
If you’ve been having difficulty getting going with RTL1090, give the IMU a try.